DIY
Guide to
Groundworks
for
Ground
Source Heating
in
a
Small
Garden
Malcolm
Crocker
Why you
should read this before doing the ground works
This is more of a diary
of one couple’s adventure with ground source heating than an
authoritative manual, but it is written in the hope that you will
avoid some of my mistakes and consider some of my methods to make
your heating system as efficient as it can be.
We placed an order with
Ice Energy for a heat pump and received a 92 page manual for the
installer of which 3 pages related to the ground works for our
project.
I was hoping to do most
of the work myself so wanted to plan the following steps (some I
found out I should have planned!)
Physical
Capability
Hire of a digger –
how long?
Purchase and
delivery of sand
Purchase of other
items listed by Ice Energy as essential to the project.
Planning the pipe
route
Planning the
digging route
Planning the pipe
testing
Getting access for
the digger
Technique for
digging required trench
Technique for
laying pipe
Technique for
application of sand
Backfilling method
Pipe Testing
Time and Cost
Preparing the
manifold
Restoring the
garden
Whatever your
background and skills I feel sure you will be interested in
considering some of these points before you start.
Our Motivation
We purchased Marchwood
because it has lovely views and great potential for renovation. We
wanted to find a way to document the difficulties of an average
family making an ordinary house zero carbon. By zero carbon we mean
that if everyone did the same UK could achieve its 2050 targets for
virtually zero residential carbon emissions. This definition does
rely on the government getting its act together and producing all
electricity from renewable sources.
We did not go the route
of micro generation because it can only form a very small part of the
nation’s energy needs and in our view is a relatively expensive
dead end.
We did not go the
pellet boiler route for two reasons. Firstly we understand there is
not enough wood in the UK to support millions of pellet boilers.
Secondly there may in the end be a ban on burning anything which
would make the boiler obsolete.
Ground source heating
is not cheap but it is a viable way of harvesting the sun’s
energy stored in the ground each year. It is well tried in
Scandinavia and Germany and well suited to many parts of the UK. Ice
Energy have installed 2000 heat pumps in the UK but it is still
little understood by the general public, local builders, plumbers
and, I suspect, by government.
The real battle is for
the efficient generation and use of energy. I find that salesmen and
engineers alike are quite vague and cautious when you ask how
efficient your heat pump will be. The standard Coefficient of
Performance (COP) depends on the efficiency of the ground loop and
the efficiency of the distribution system in the house I am told.
I want to initiate COP
wars in which heat pump users vie with each other for the highest
efficiencies and we all learn how to do things better.
As result I have
incorporated some ideas of my own which you will read about later if
you wish.
Physical Capability
Part of planning is to
make sure you are physically capable of undertaking the task. The 200
metre coils are quite heavy. The delivery driver passed me the 100
metre coil to carry to the back of the house but delivered both the
200 metre coils himself. After he had gone I checked the weight and
found I could roll them along level ground with reasonable ease. This
proved to be the most demanding part of the job so the rest was
possible.
The other factor is the
number of working hours in the day and the week. When hiring a digger
at £200 per week your schedule and fitness must allow for 120
hours work in about 2 to 3 weeks. Driving the digger is no more
demanding than driving a car but rather more interesting. I did not
find any inclination to go to sleep at the wheel! Barrowing sand and
fitting the pipe is more demanding. As you start doing it you may
find you can benefit from some help with that, as I did.
Getting Started
M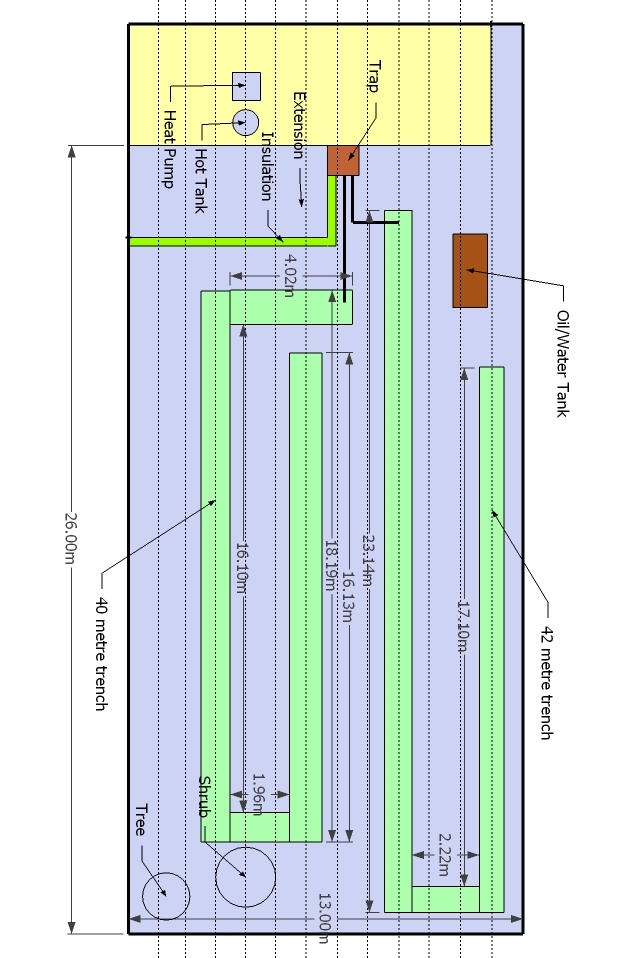 ost
texts are written by experts and assume more knowledge than I have,
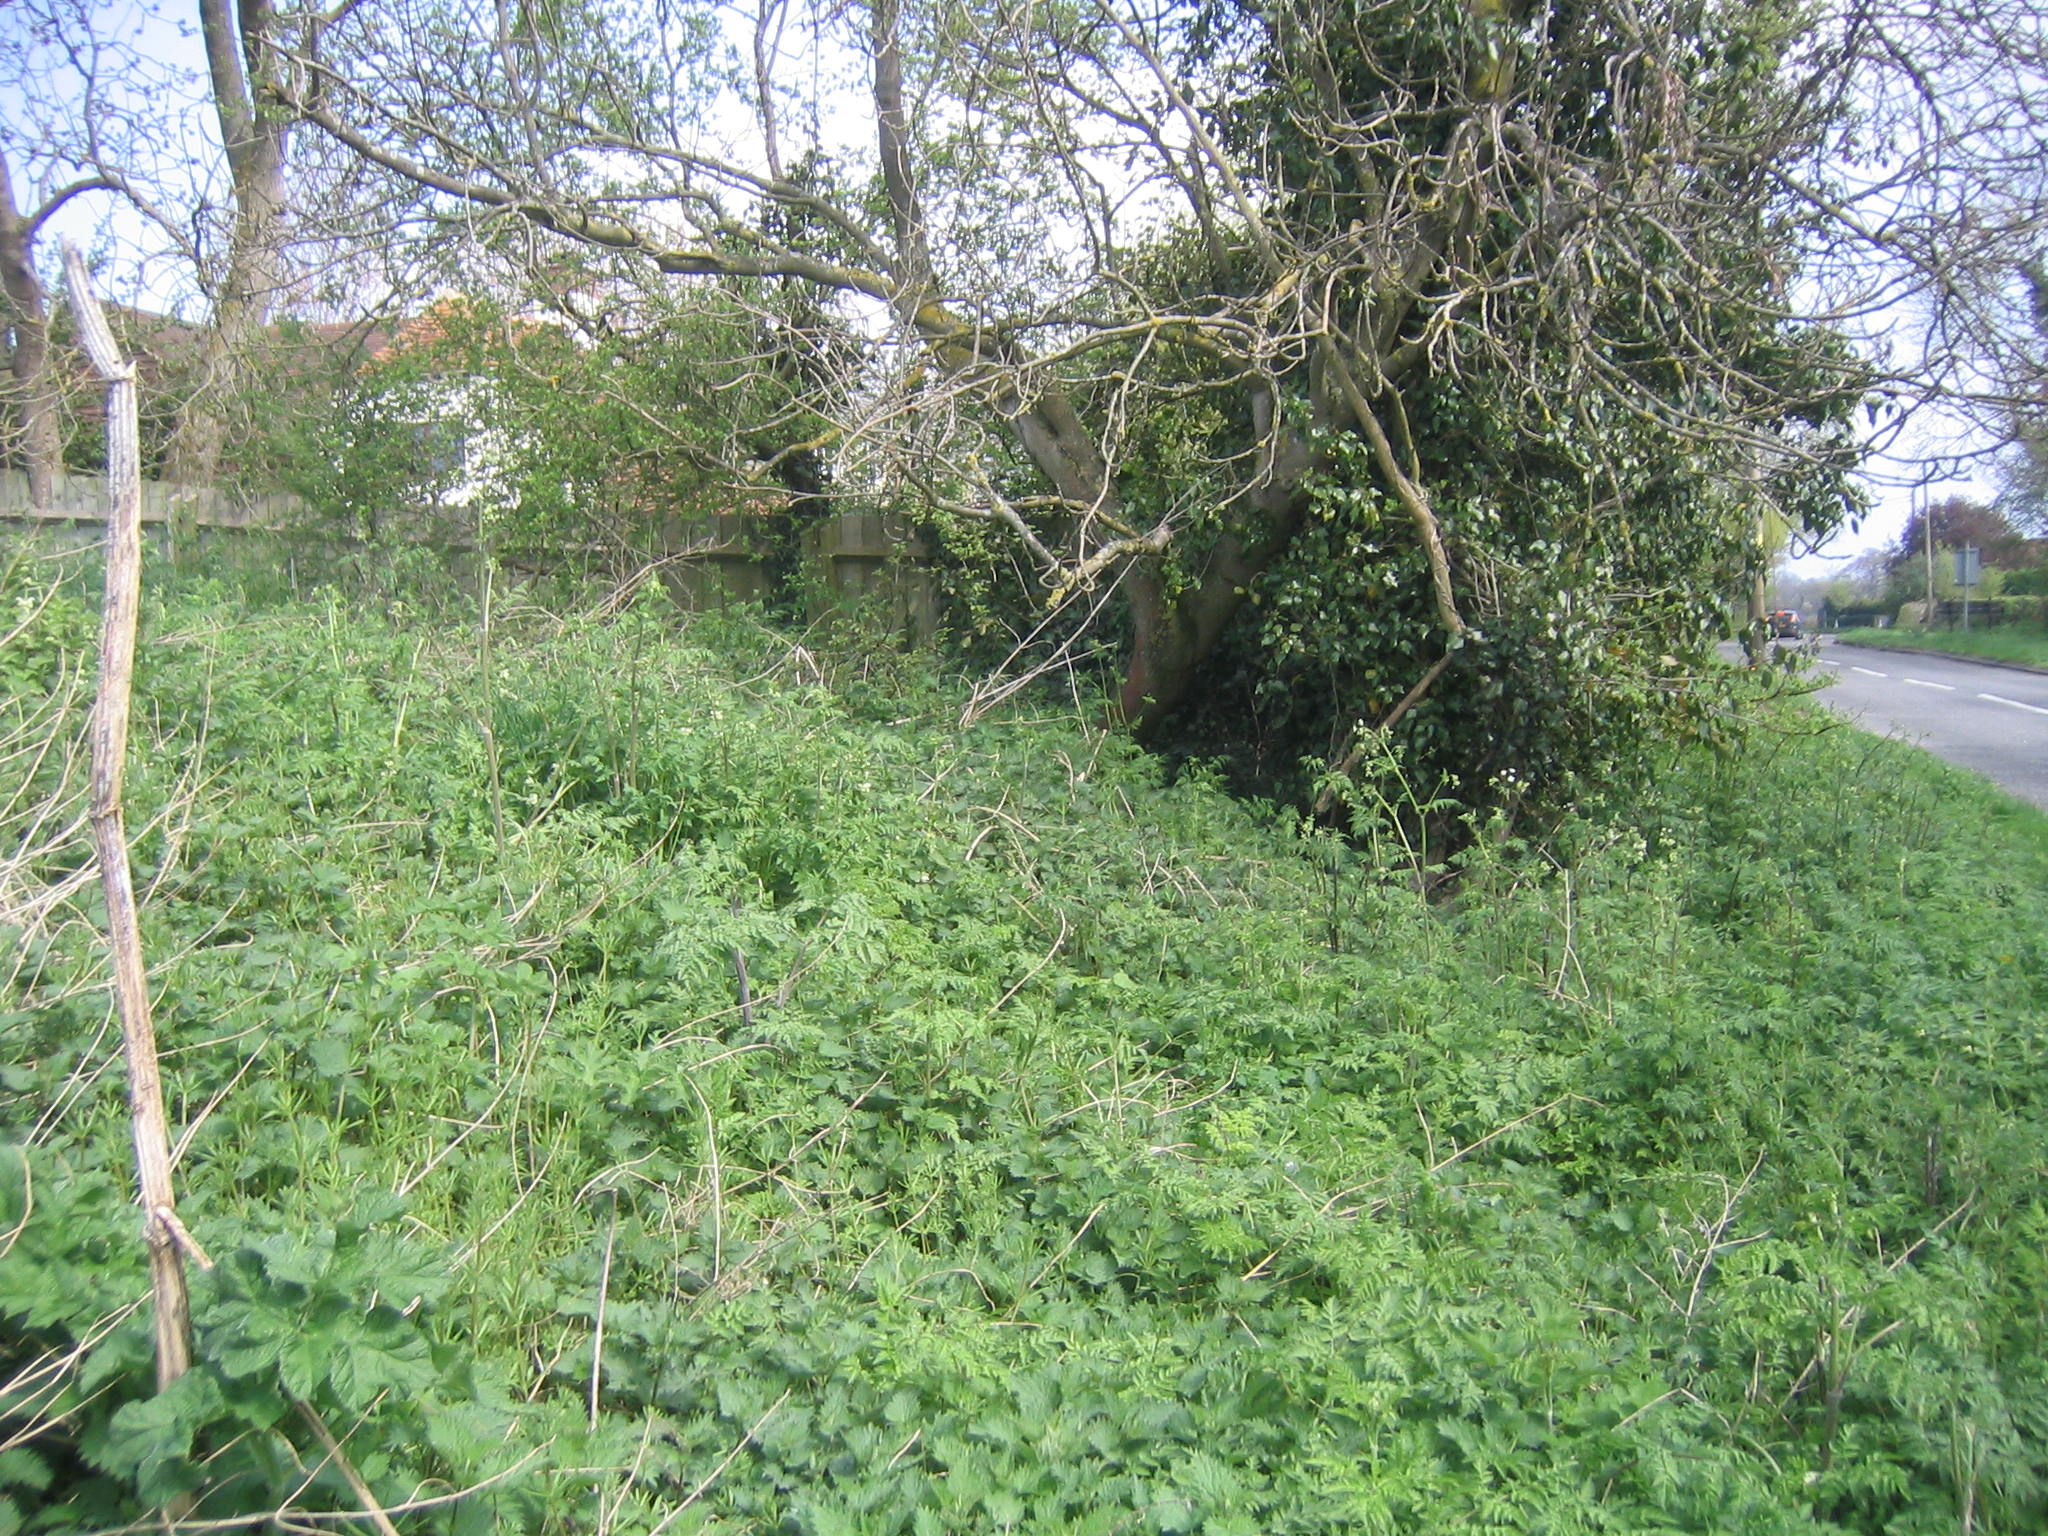
and this is no exception. We have a small garden 26 metres by 13
metres and I had drawn up a plan during my discussions with Ice
Energy. Their surveyor then attended the property and said I had done
his work for him.
ost
texts are written by experts and assume more knowledge than I have,
and this is no exception. We have a small garden 26 metres by 13
metres and I had drawn up a plan during my discussions with Ice
Energy. Their surveyor then attended the property and said I had done
his work for him.
He confirmed my plan,
answered a few questions I had, and went away.
I then read the Pump
Installation Manual and started to understand what was needed.

The diagram showed a
pattern of loops in a straight trench with a return pipe along the
other side of the trench attached with cable ties to each loop. The
result looked so neat in the photograph and a real piece of cake!
I paid the next
instalment of the purchase price and the first surprise arrived.
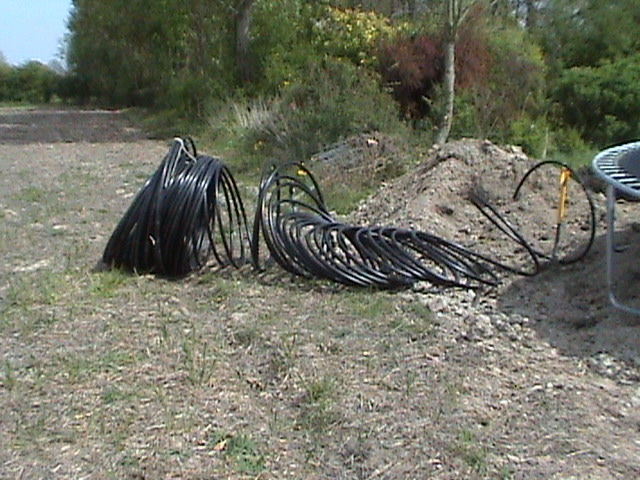
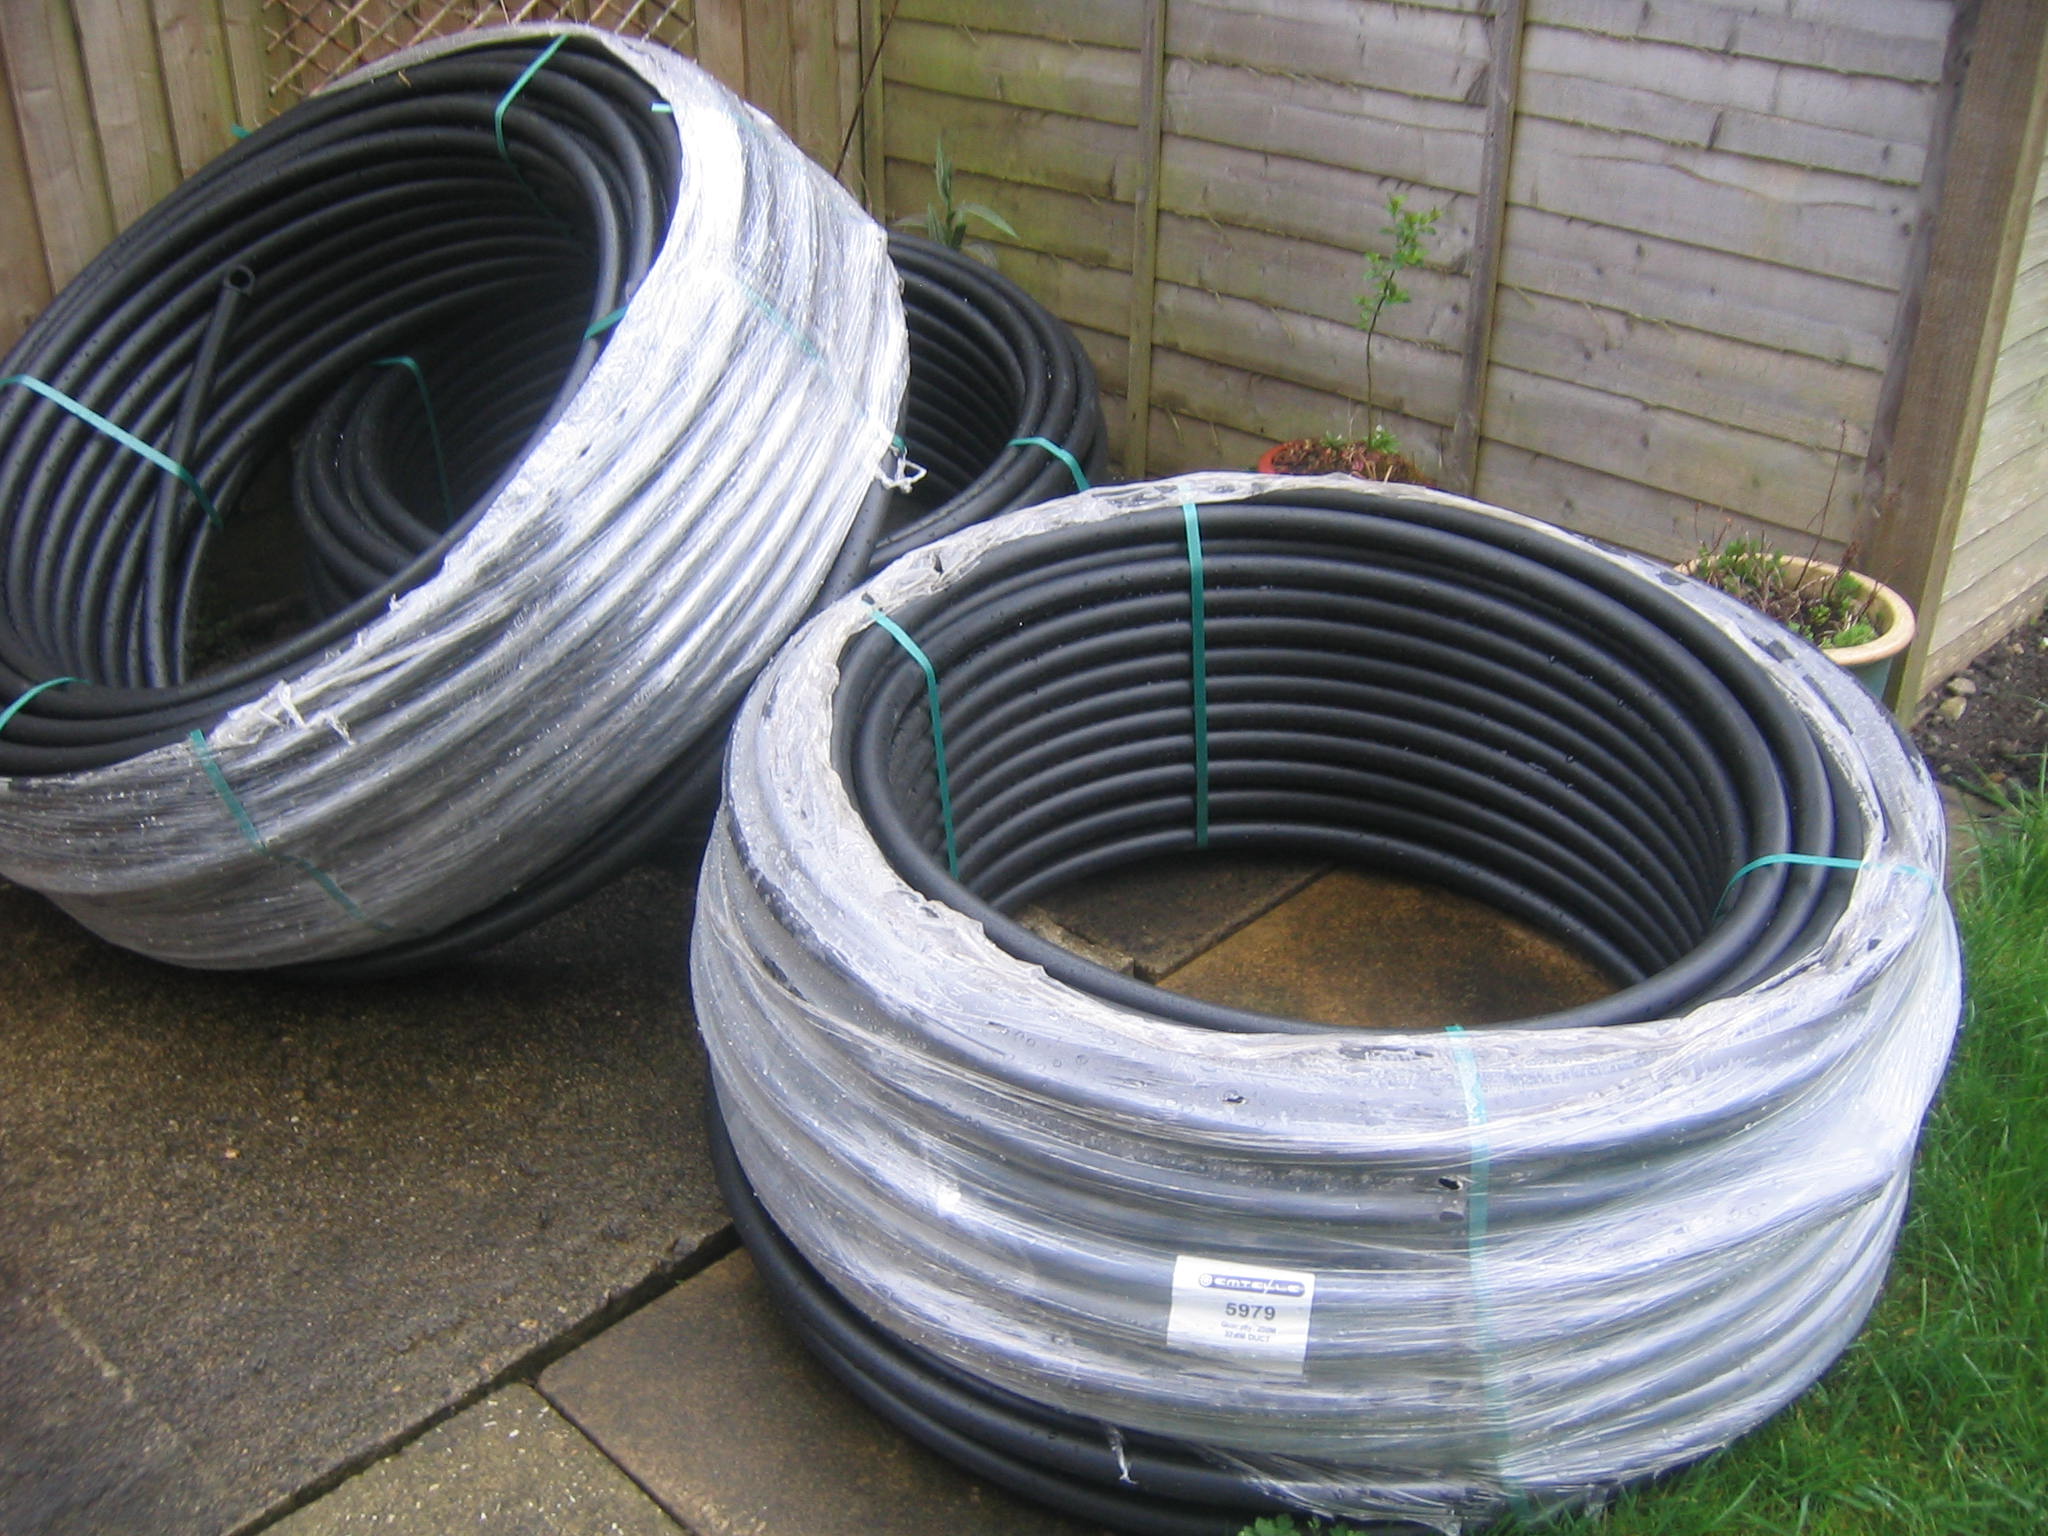 The
2 coils of pipe 200 metres each long were much heavier than I
expected and much less flexible. I was later to learn the
significance of this. The third coil was for the connections.
The
2 coils of pipe 200 metres each long were much heavier than I
expected and much less flexible. I was later to learn the
significance of this. The third coil was for the connections.
Planning the Route
I had done quite a lot
of research to find out whether slinky collectors were suitable for
my sized garden. At the Buildbase Centre in Swindon an expert
recommended an air source heat pump instead because it would be
cheaper to install and my garden barely had the area needed. He said
I should not be drawing more that 40 watts per square metre from the
ground or the sun in the Summer would not be able to replenish the
heat I had used.
This came as a surprise
to me because I thought the heat came from the ground. Even with a
borehole the heat all has to be replenished by the sun.
I submitted one or two
designs to Ice Energy and their surveyor eventually approved the one
illustrated with 200 metres of pipe in 80 metres of trench with the
trenches 2 metres apart.
Studying the manual
again I became aware of what would be happening under the ground.
There were warnings to insulate the cold pipe running from the heat
pump very well so that it did not cool the warmer water returning
from the ground. This would be giving away the precious heat just
before it entered the building safely.
As you can see my plan
is based on 2 U shaped trenches each containing 200 metres of pipe.
Under these circumstances it appeared we could do better than the Ice
Energy model as in that the return pipe is attached to each outgoing
loop and must loose a little heat at each contact point. I asked Ice
Energy whether I could return from the other end of the U trench
directly and they approved.
I did not straight away
realise that this would mean the loops in the trench would be closer
together as the way back was shorter.
I planned a start point
near the house on the South trench so that spoil could be stacked
beside it leaving a narrow path for the barrowing. There would be
less space at the corners so spoil would be stacked on the farmer’s
field margin at the back of the property. Without this extra space it
would have been more difficult but not impossible..
Most of my planning
worked out well and I was blessed that the mistakes I made did not
prove critical. For example, I had not noticed that the garden
tapered by 1 metre towards the house!
I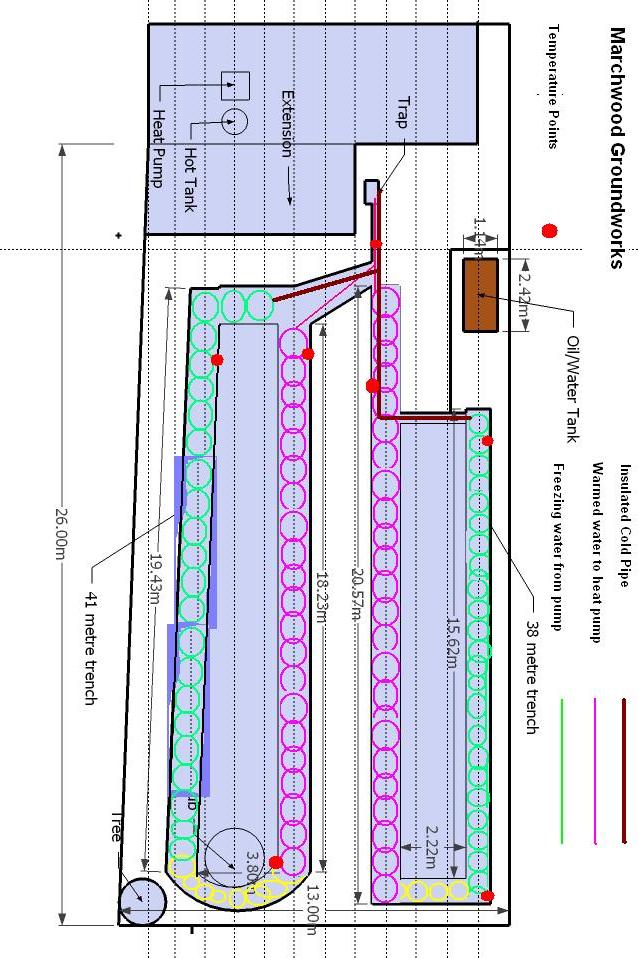 found I could dig between a bush and a young copper beech tree
without encountering large roots so this lengthened my North circuit
to compensate for other losses. I also adjusted the plan somewhat to
make the trenches simpler nearer to the house. It is better to dig as
much as possible moving backwards over firm ground and then digging
the connecting trenches from the side to a lesser depth. I have a
test point to make sure the temperature is not lowered significantly
by an insulated pipe from the heat pump going through.
found I could dig between a bush and a young copper beech tree
without encountering large roots so this lengthened my North circuit
to compensate for other losses. I also adjusted the plan somewhat to
make the trenches simpler nearer to the house. It is better to dig as
much as possible moving backwards over firm ground and then digging
the connecting trenches from the side to a lesser depth. I have a
test point to make sure the temperature is not lowered significantly
by an insulated pipe from the heat pump going through.
This illustrates what
happened in fact.
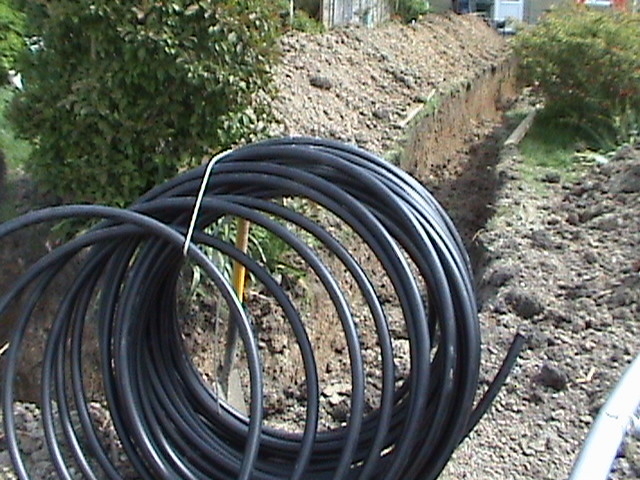
Buying the Sand
40 tons of sand seemed
a lot to have to barrow from the front garden to the back so I asked
if it was essential to have 100 mm under the pipe as well as 100mm
over the pipe. The Ice Energy engineer explained that the sand was
not to protect the pipe but to ensure a good contact between soil and
pipe without any voids. Voids he explained could cause lower
efficiency and could cause the ground to heave. The most important
step was to use a lot of water when covering the pipe to ensure the
best contact.
I purchased 20 tons of
sand, allowing for 100mm over the pipe, and resolved to buy more if I
ran short.
I got 2 quotes locally.
One was from a local coal, sand and gravel merchant and the other
from H. R. Smith, an aggregate supplier, so I could compare these
with the Wickes bag price. The prices were £500, £396 and
£750 and a local farmer later confirmed that I had made the
right choice. Even so, sand is not to be wasted!
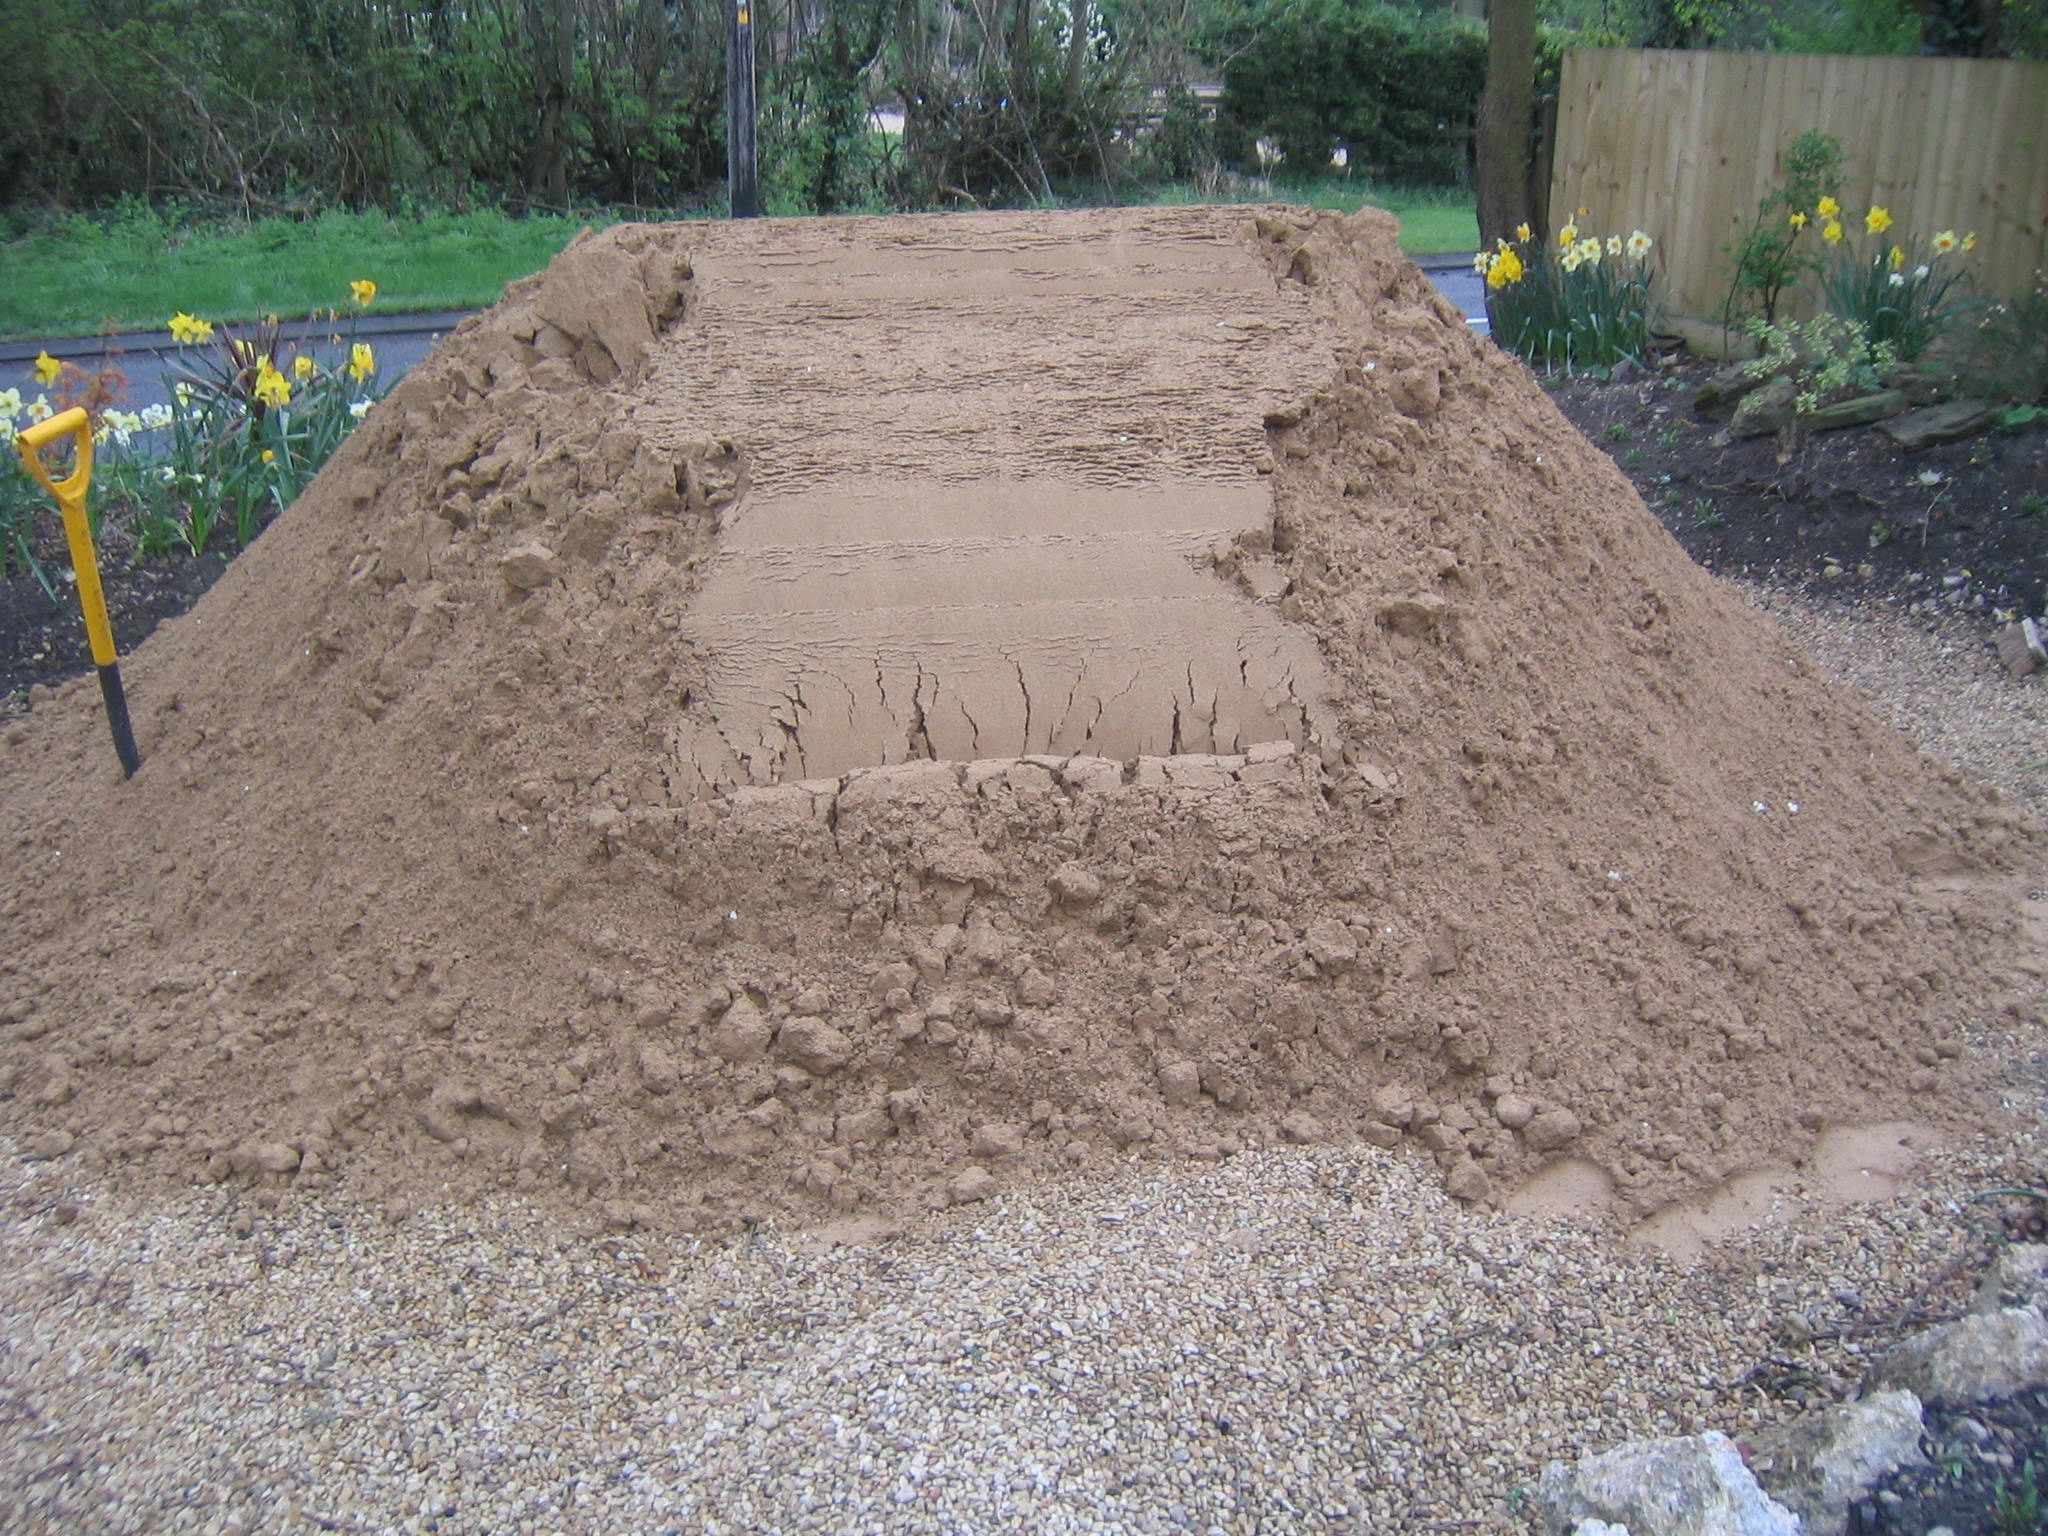
Delivery from a 20 ton
truck proved difficult. I had planned the width into the drive OK but
I had forgotten that it needed about 7 metres height to tip its load.
The driver managed after 2 attempts without any damage to trees and
telephone wires!
I did find out later
that a cheaper grade of sand than builder’s sand is available
but I’m not sure if it can be used.
Hire of a Digger – How long?
My only previous
experience of digger hire was a couple of days to reshape a garden. I
thought a week would be sufficient. I booked a week and then found
that according to my favourite weather forecast, Windguru, about an
inch of rain would fall in the first 5 days. This looked too much to
cope with. I could imagine sliding on the mud into the ditch I had
dug, and wondered how much it cost to recover a digger from a hole!
More about that later.
The week proved
glorious, with very little rain, so the second week I went ahead even
though the forecast was bad. The machine was a 1 ton Kubota U15-3
from Greenplant in Wheatley and cost £196 plus VAT for the
week. It has the advantage of shrinking its tracks to 965mm for going
down our 1 metre sideway but I wanted to get it delivered to the back
garden first as I had gained permission from the farmer behind.
The digger arrived and
we had the choice of a steep bank from a ditch into the field behind
or a chug round the field margin fro a quarter of a mile away.
The delivery guy was
most helpful and tried the steep bank for me. It was about 1 in 1 and
he tried it backwards with the bucket lowered behind him. It got most
of the way up but just failed at the crest. So he loaded the digger
on the trailer again and took it to the field gate.. There he
unloaded, took the trailer over the rough entrance, and then reloaded
for the trip round the field, a final unload, and a brief
demonstration. What helpful service!
The only obstruction
underground I expected was the oil pipe from the tank to the house. I
expected this to run direct to the house path and then along to the
kitchen entrance.
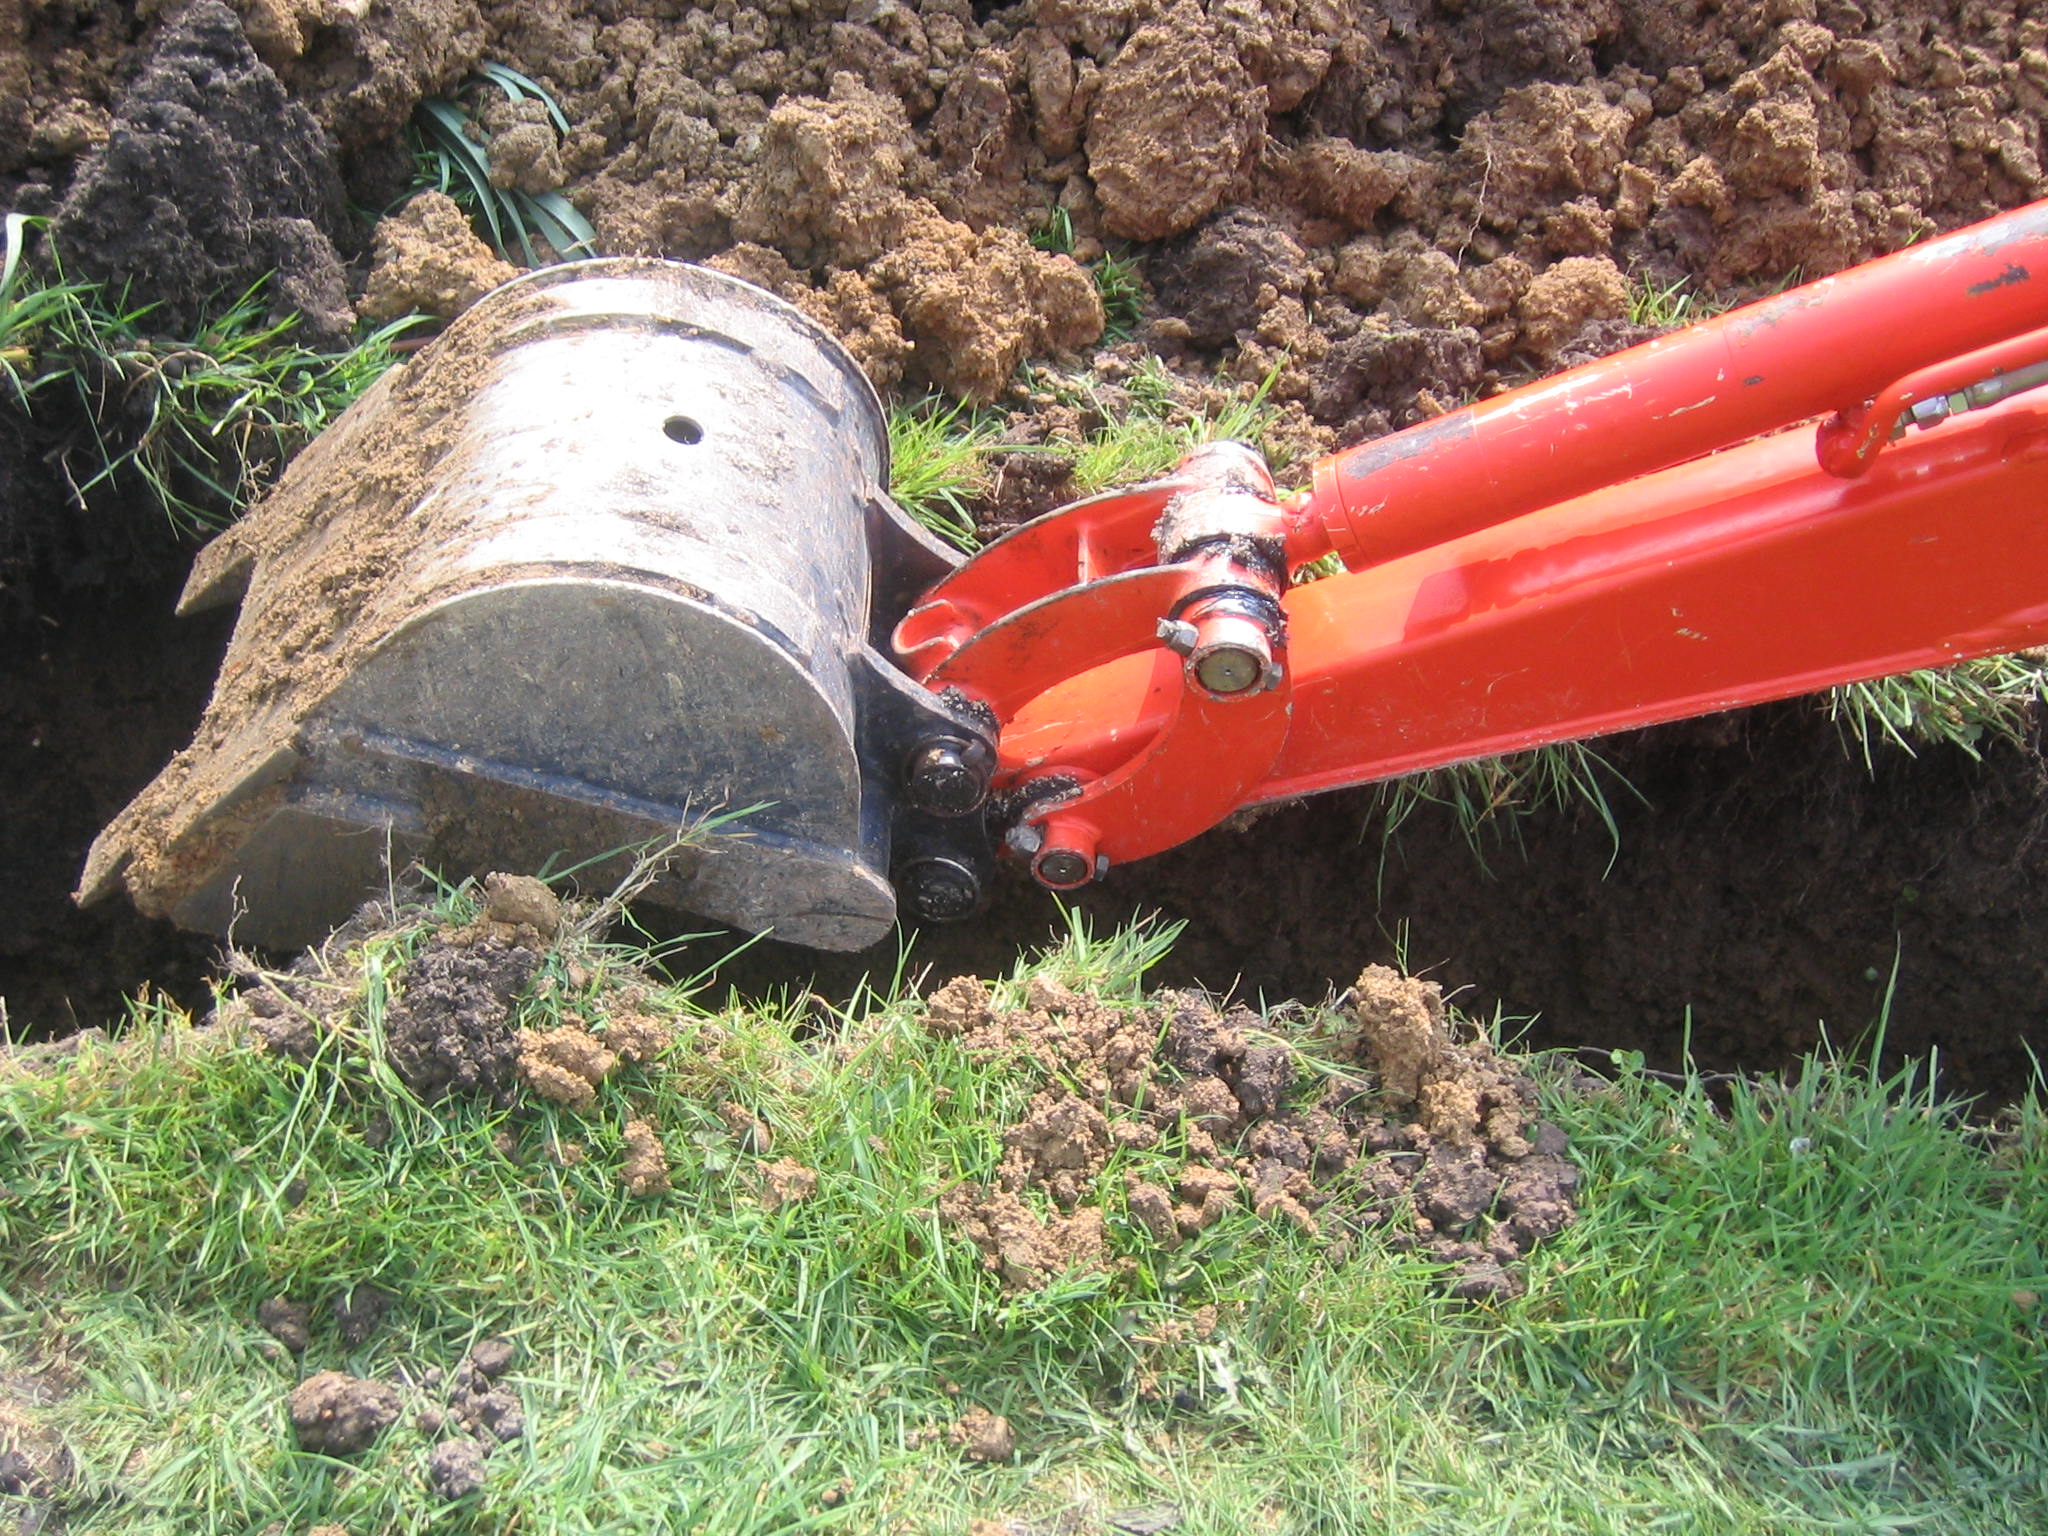
I changed the bucket to
the narrowest one and dug a communication ditch from the position of
the manhole for the manifold to the nearest slinky trench.
Wow! Almost the second
scoop I hit the oil pipe which went diagonally in a curve from the
end of the tank to the entry point for the house. Thankfully it bent
but did not sever!
Starting again a bit
further along the line I was going great guns when the rain came!
It rained most of the
next 3 days, and I also noticed that, in my enthusiasm I had dug the
narrow communication trench too long and needed to widen it. Progress
was so slow that I wondered whether it would take more than a month.
Choice of Bucket
I changed to the next
size of bucket and made better progress. I often found the clay soil
did not fall out of the bucket onto the spoil and I had to get down
and clear it with a spade. At last the first of the 4 trenches was
completed in about a week.
Later I changed to the
largest digging bucket (600mm one with claws on) and made even better
progress doing a metre every half hour. The soil seemed not to stick
in the larger bucket
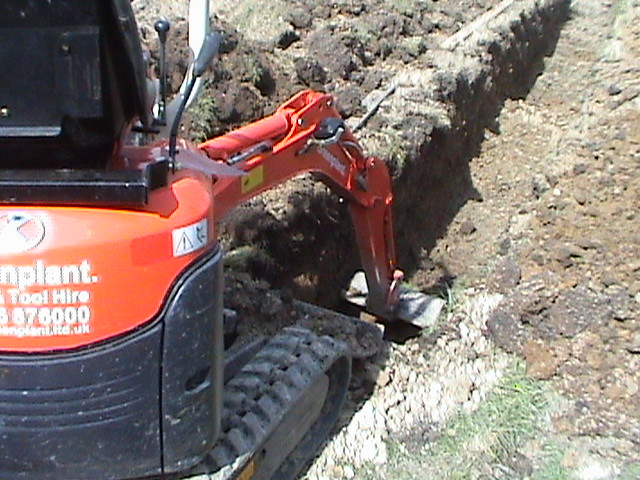
Digger Technique
At first it was
difficult to maintain the width of the trench to the metre required
at the bottom. The corners tended to round and the trench narrow
without constant reworking and checking. Then I started using the
skew foot control to offset the arm to the right or left depending on
the side I was excavating. This means the scoop automatically
excavates right into the corner at the bottom of the trench and
reworking is not needed.
Planning the spoil is
an art too as you have to have access for a barrow of sand either to
right or to the left of each trench. It is often necessary to push
the top off the spoil pile as the bucket releases the next scoop
full. Quite fun!
Dick came across the
road and gave me a hand. As a farmer he has had a lot of digger
experience, although the controls on the Kuboto work the opposite way
to a JCB. He surprised me by backfilling the trenches very well with
the small scraper blade on the front of the Kuboto.
He also explained that
sinking in a trench should not be a problem as you can prop the
digger off the ground by forcing the bucket down and then add spoil
under the tracks to enable the digger to climb out. I only had to do
this once but it works very well.
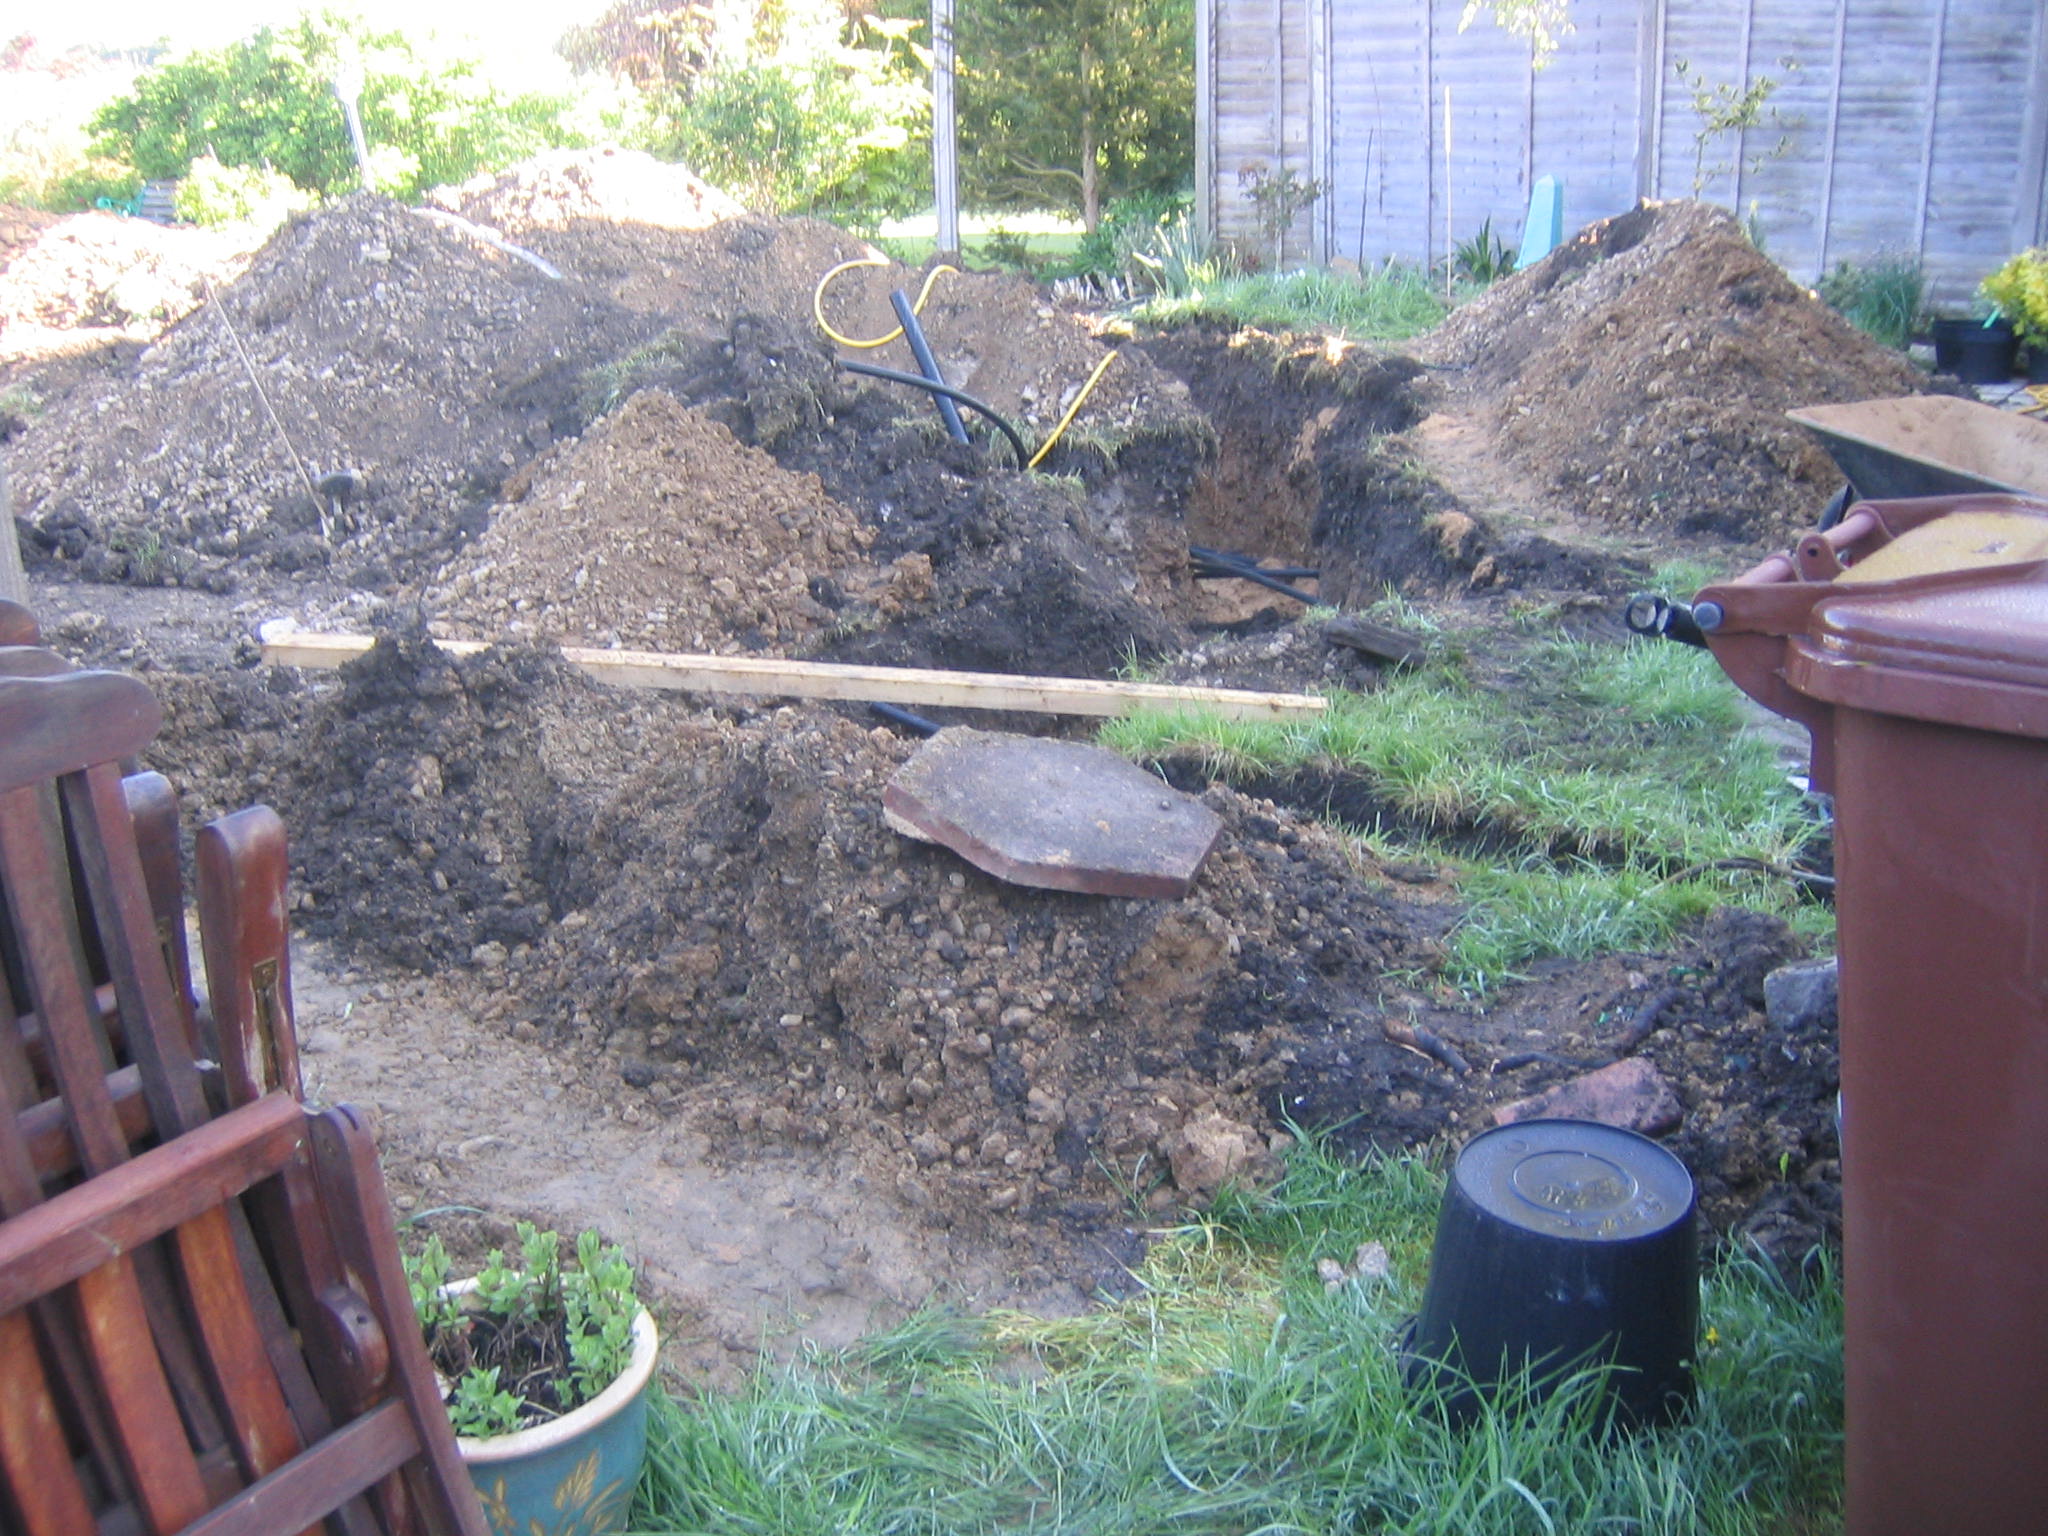
The placing of the
spoil from the trenches must be planned to ensure access to the
trench with barrows of sand, ease of backfilling and ensuring the
digger is not encircled by trenches when you need it elsewhere,
perhaps to load the sand onto the barrow. Particularly near the house
this can be difficult where trenches link together.
If you can place the
topsoil separately from the subsoil then this will help to restore
the garden to its former glory. If only one spoil row is possible
then why not place the topsoil further from the trench and the
subsoil nearer. In this way you can use the scraper to backfill the
base of the trench and place the topsoil last with the bucket.
Don’t worry too
much as a good rotavation afterwards should spread enough top soil
from the 2 metres between the trenches across the trenched areas.
(This proved rather optimistic as you will read!)
Technique for laying the pipe
Don’t be fooled
by the pictures. That pipe is stiffer and thicker in relation to a 1
metre trench and can put up a real struggle. It is heavy to handle
and, like its namesake slinky toy, once it gets tangled it is hard to
fathom how to untangle it.
My first attempt was
rather poor. I rather lost control of the slinky in the first trench.
I tried to follow the instructions not to fully unroll the coil but
even so it does not uncoil very evenly into the trench.
T
 ake
great care not to kink the pipe or set up tensions that may kink
later under the ground. If a kink should occur Ice Energy say you
must cut out the damaged pipe and make a proper join. Fortunately I
avoided this. I discovered that you can use the spring in the pipe to
anchor it in place by cutting into the side of the trench at an angle
below where the loop touches it. The spring in the pipe then secures
it to the floor of the trench.
ake
great care not to kink the pipe or set up tensions that may kink
later under the ground. If a kink should occur Ice Energy say you
must cut out the damaged pipe and make a proper join. Fortunately I
avoided this. I discovered that you can use the spring in the pipe to
anchor it in place by cutting into the side of the trench at an angle
below where the loop touches it. The spring in the pipe then secures
it to the floor of the trench.
I allowed too much space between some of the coils and then had to
double up on others to use all of the pipe by the end of the U shaped
trench.
allowed too much space between some of the coils and then had to
double up on others to use all of the pipe by the end of the U shaped
trench.
T urning
the corners was difficult and I put the pipe in whichever way it
would go without stressing it too much. This meant figures of eight
and long overlapping loops where necessary.
urning
the corners was difficult and I put the pipe in whichever way it
would go without stressing it too much. This meant figures of eight
and long overlapping loops where necessary.
For the second U trench
I was more methodical. I dragged the coil of pipe to the field at the
end of the garden where the curve of the U will be. I had noticed
that trouble starts from the ends so I tied the end in the middle of
the coil to a spade in the ground and fed the loops out of the centre
of the coil without unrolling so that they stood in a line on the
field.
I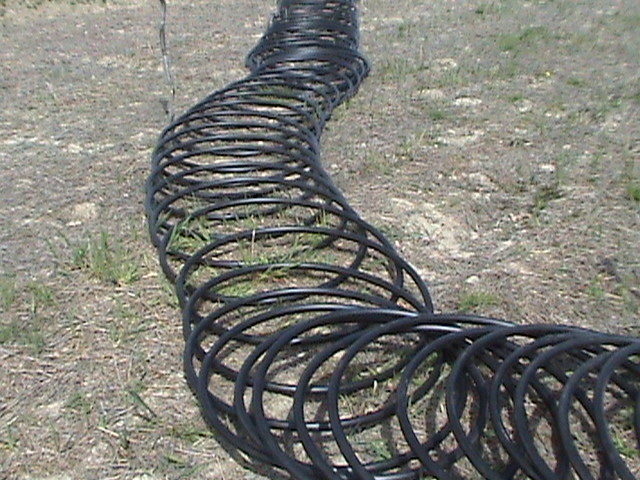 secured the last 4 loops together so that the other end would not
cause trouble.
secured the last 4 loops together so that the other end would not
cause trouble.
There were 60 loops so
I planned 28 for the first leg of the U and marked the 28th
loop.

I gathered the 28 loops
back into a coil carefully ensuring that they remained in sequence
and untangled and tied them with soft rope for ease of handling. The
28th loop I pegged down with a fork.
I could then heave the
bunch of loops into the trench, release a few from the rope, and move
down the trench paying them out one by one.

I found it was better
to arrange the loops on their side in the trench ready to be
flattened and fitted later.
H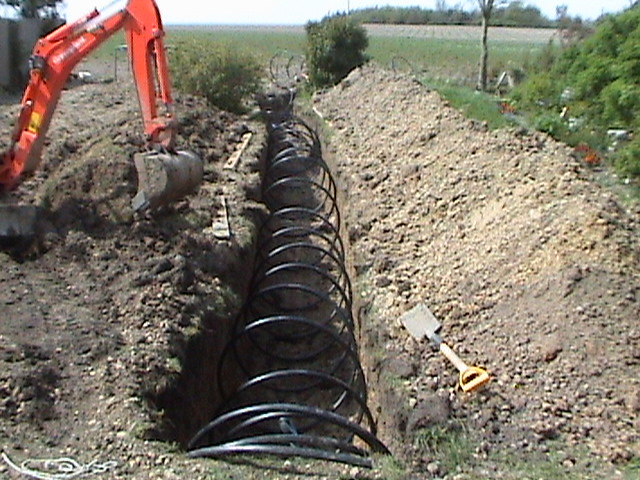 aving
got to the end they needed to be evened out. Care was taken that the
end was long enough to reach the manifold position with a metre to
spare.
aving
got to the end they needed to be evened out. Care was taken that the
end was long enough to reach the manifold position with a metre to
spare.
Then comes the fitting.
I found this easier without sand in the hole. It is easier with some
help, but if alone, roughly fit the coils in the trench using feet to
hold them down, tying a few of the cross-overs with cable ties and
undercutting the sides where necessary.
O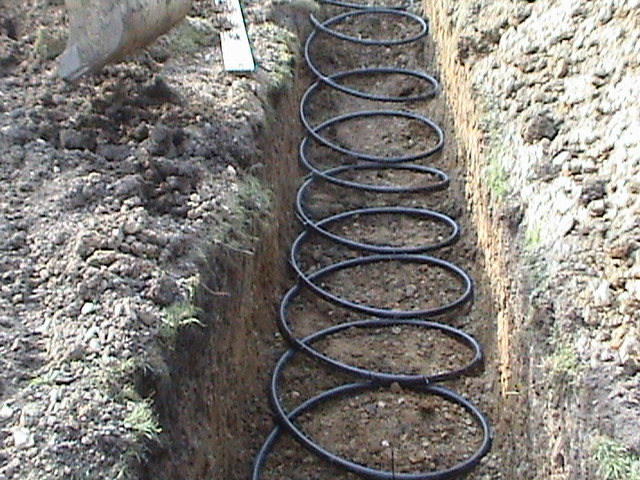 nce
the length is in place go back and improve the fit to the floor of
the trench by removing bumps in the floor and further undercutting at
the sides. Use ties on all cross-overs to make the whole very secure.
nce
the length is in place go back and improve the fit to the floor of
the trench by removing bumps in the floor and further undercutting at
the sides. Use ties on all cross-overs to make the whole very secure.
Technique for applying the sand
The sand is to improve
the contact between the pipe and the ground so I expect it to be
important in getting the best efficiency from the system. It is also
expensive and heavy to barrow so you don’t want to use more
than you need.
I applied the sand over
the pipe in sufficient quantity to tread down all round the pipe and
fully hide it. This usually meant the middle space was covered but
not always to the same depth.
It was difficult to
divide the sand piles into 4 evenly so I found that by the time I had
reached the 4th trench I had too much sand over. I used
this both under and over the pipe.
I wanted to use the
digger to load the sand barrows so I reduced the width of the tracks
so that it would go down the sideway to the front garden. Then very
gingerly, with about 2cms each side, I crawled slowly through. A
branch of a tree I had not noticed was the only casualty that time!
Later with a bit more confidence I managed to damage the neighbour’s
fence.
Adjusting the width of
the tracks is best done with the digger suspended between its scraper
at the front and bucket at the back. It then widens and narrows with
ease.
Barrowing the sand is
hard work and at 74 I want to use the most energy efficient method.
Firstly keep the sand as dry as possible as wet sand seems twice the
weight. Secondly don’t over fill the barrow. If you have to
struggle it is probably too full. I manage a builder’s barrow
about ¾ full.
Wheel the barrow with
the handles at arms length by just leaning forwards. If it does not
roll easily forward then you have over filled. You will wheel many
times over the same track so it is worth while to fill any dips and
clear any bumps.
W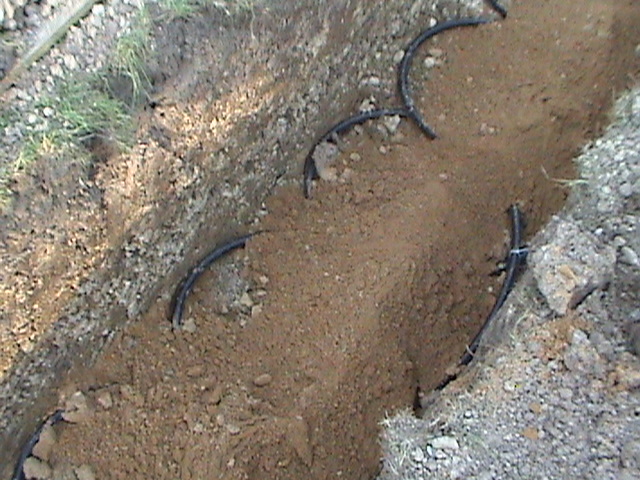 hen
near the trench it is better for the barrow to fall in than for you
to follow it. Let go if in doubt.
hen
near the trench it is better for the barrow to fall in than for you
to follow it. Let go if in doubt.
It sounds obvious but
following these tips makes it more fun anyway.
When pressing the sand
around the pipes you may get some help from the grandchildren if you
can agree the price!

Technique for Backfilling
Before backfilling use
the trench for running armoured cable you will need for garden
lighting, pumps for rainwater use, garden water connections and
anything else you can think of.
The backfilling method
will depend on the location of the spoil piles. First backfill any
trenches you will need to cross to reach the main spoil piles.
T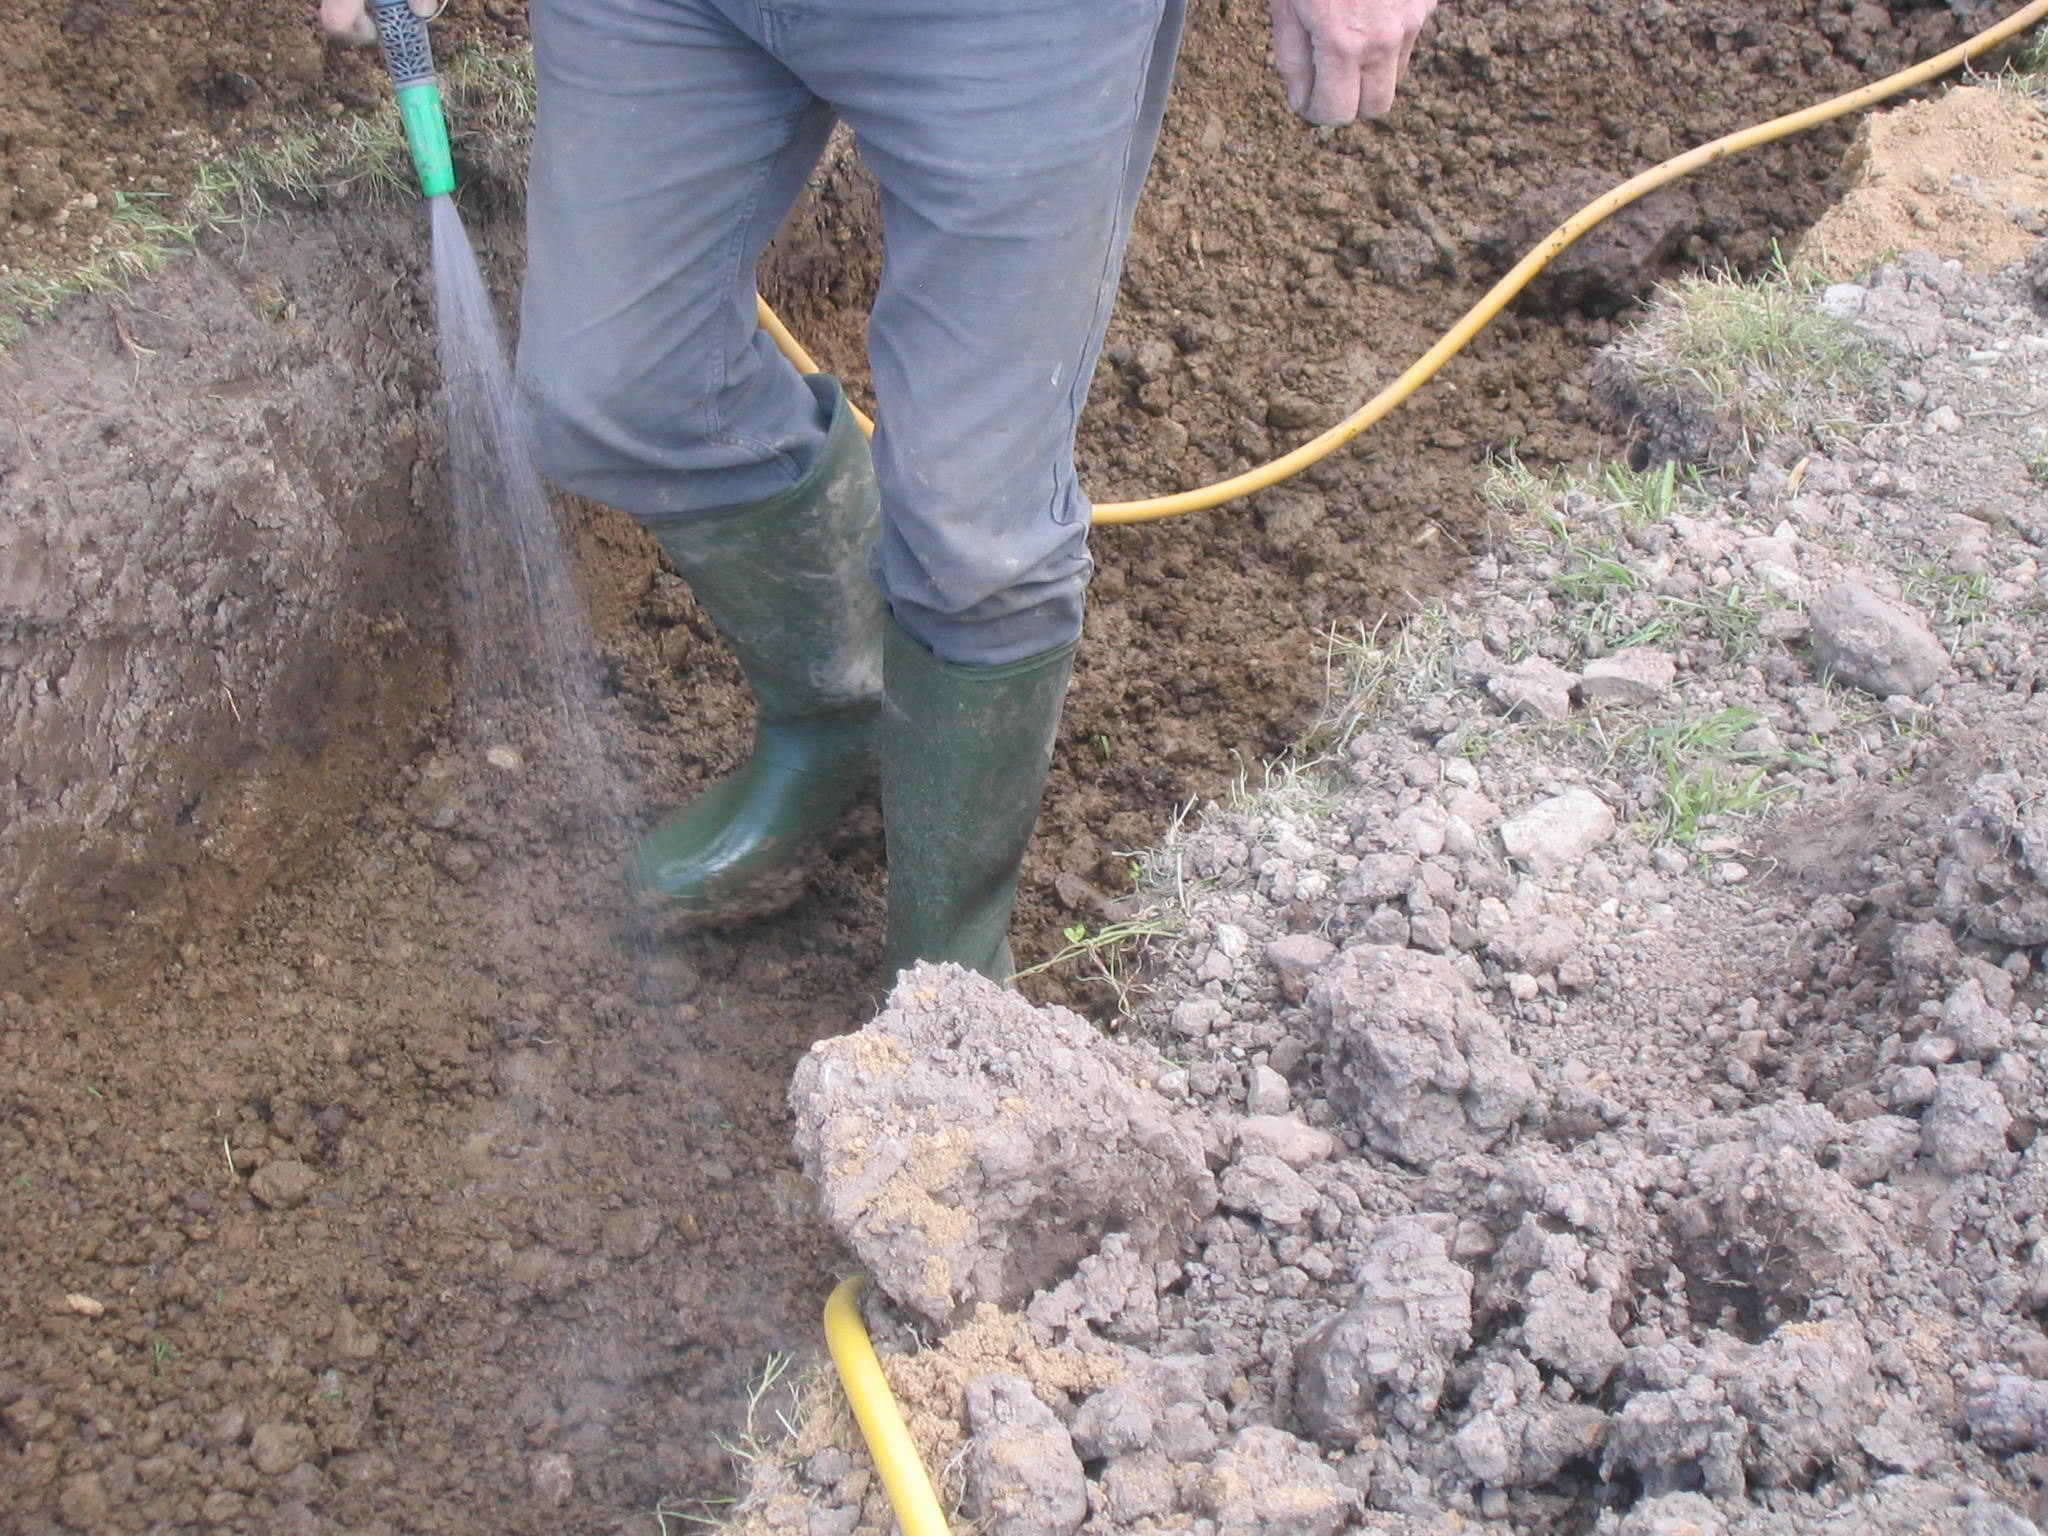 he
first 15 to 30 cms of fill should be watered and trampled to make a
really muddy base to give good contact with the pipe. Once more than
30 cms has been put in the trench it may be difficult to get the mud
trampled well right down to the sand. After this back fill the rest
of the trench. Working in 3 metre sections seemed to work well for me
single handed.
he
first 15 to 30 cms of fill should be watered and trampled to make a
really muddy base to give good contact with the pipe. Once more than
30 cms has been put in the trench it may be difficult to get the mud
trampled well right down to the sand. After this back fill the rest
of the trench. Working in 3 metre sections seemed to work well for me
single handed.
The scraper blade of
the digger is good for this but the first 30 cms is probably easier
done with the shovel of the digger. Fill the trench to slightly above
the original level and use the weight of the digger to roll it down.
Don’t get the surface soil too wet or this will hamper the
work.
If the digger gets
stuck or sinks too far into a hole then it is usually easy to get out
by lifting one end or both with the s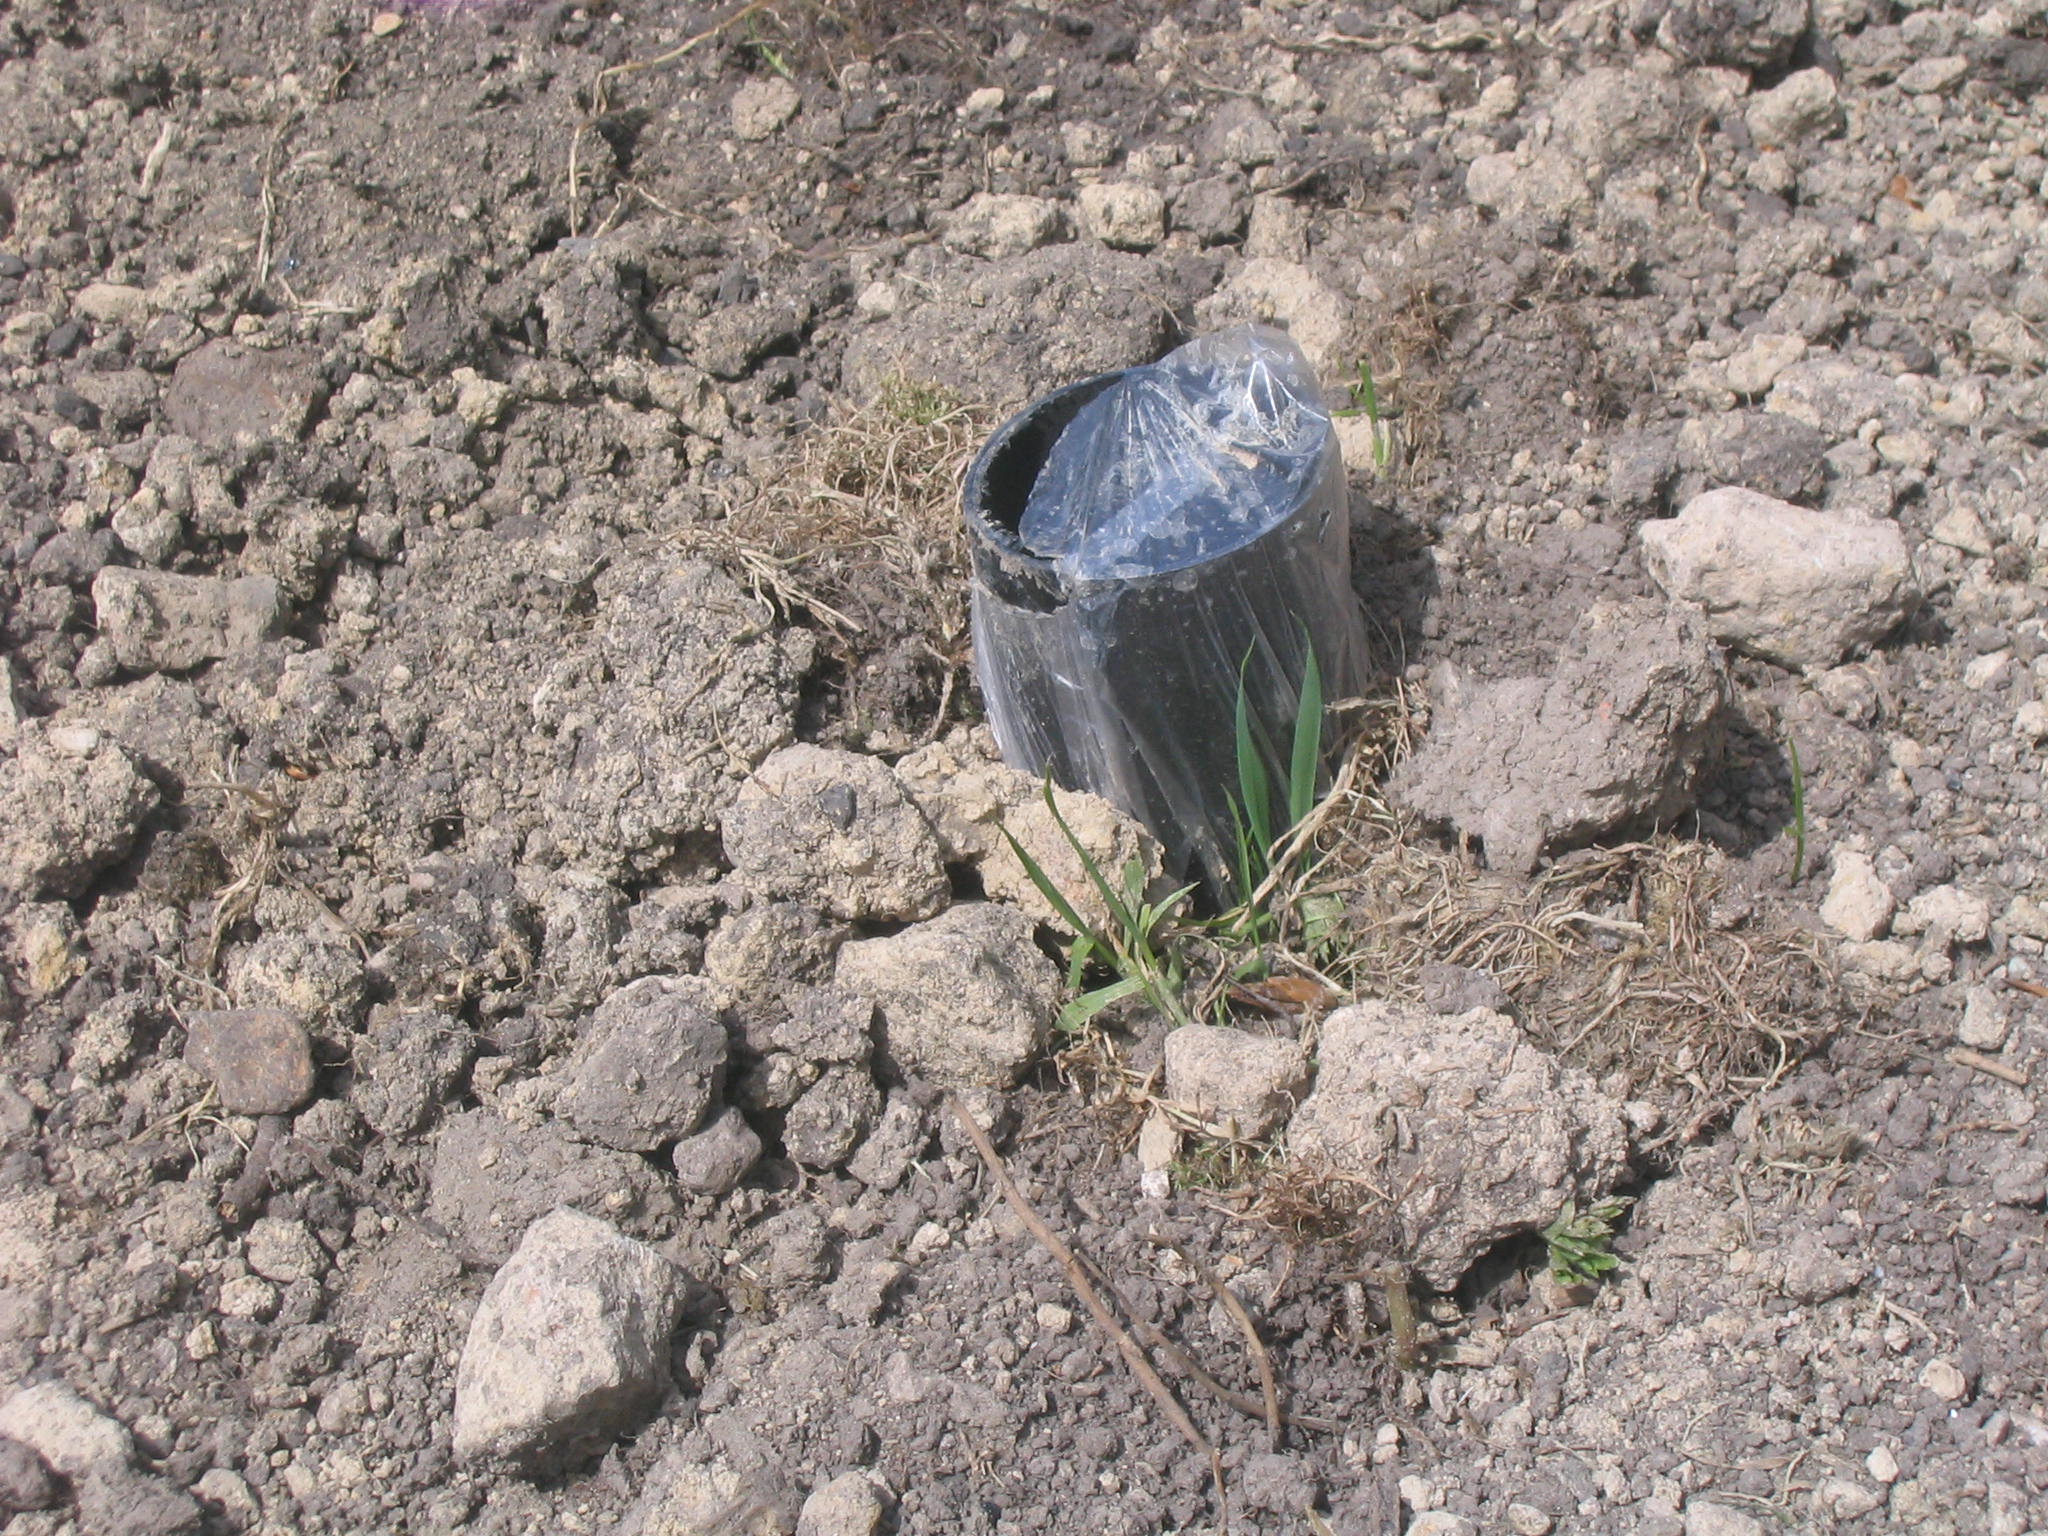 craper
and the bucket so that spoil can be shovelled into the space.
craper
and the bucket so that spoil can be shovelled into the space.
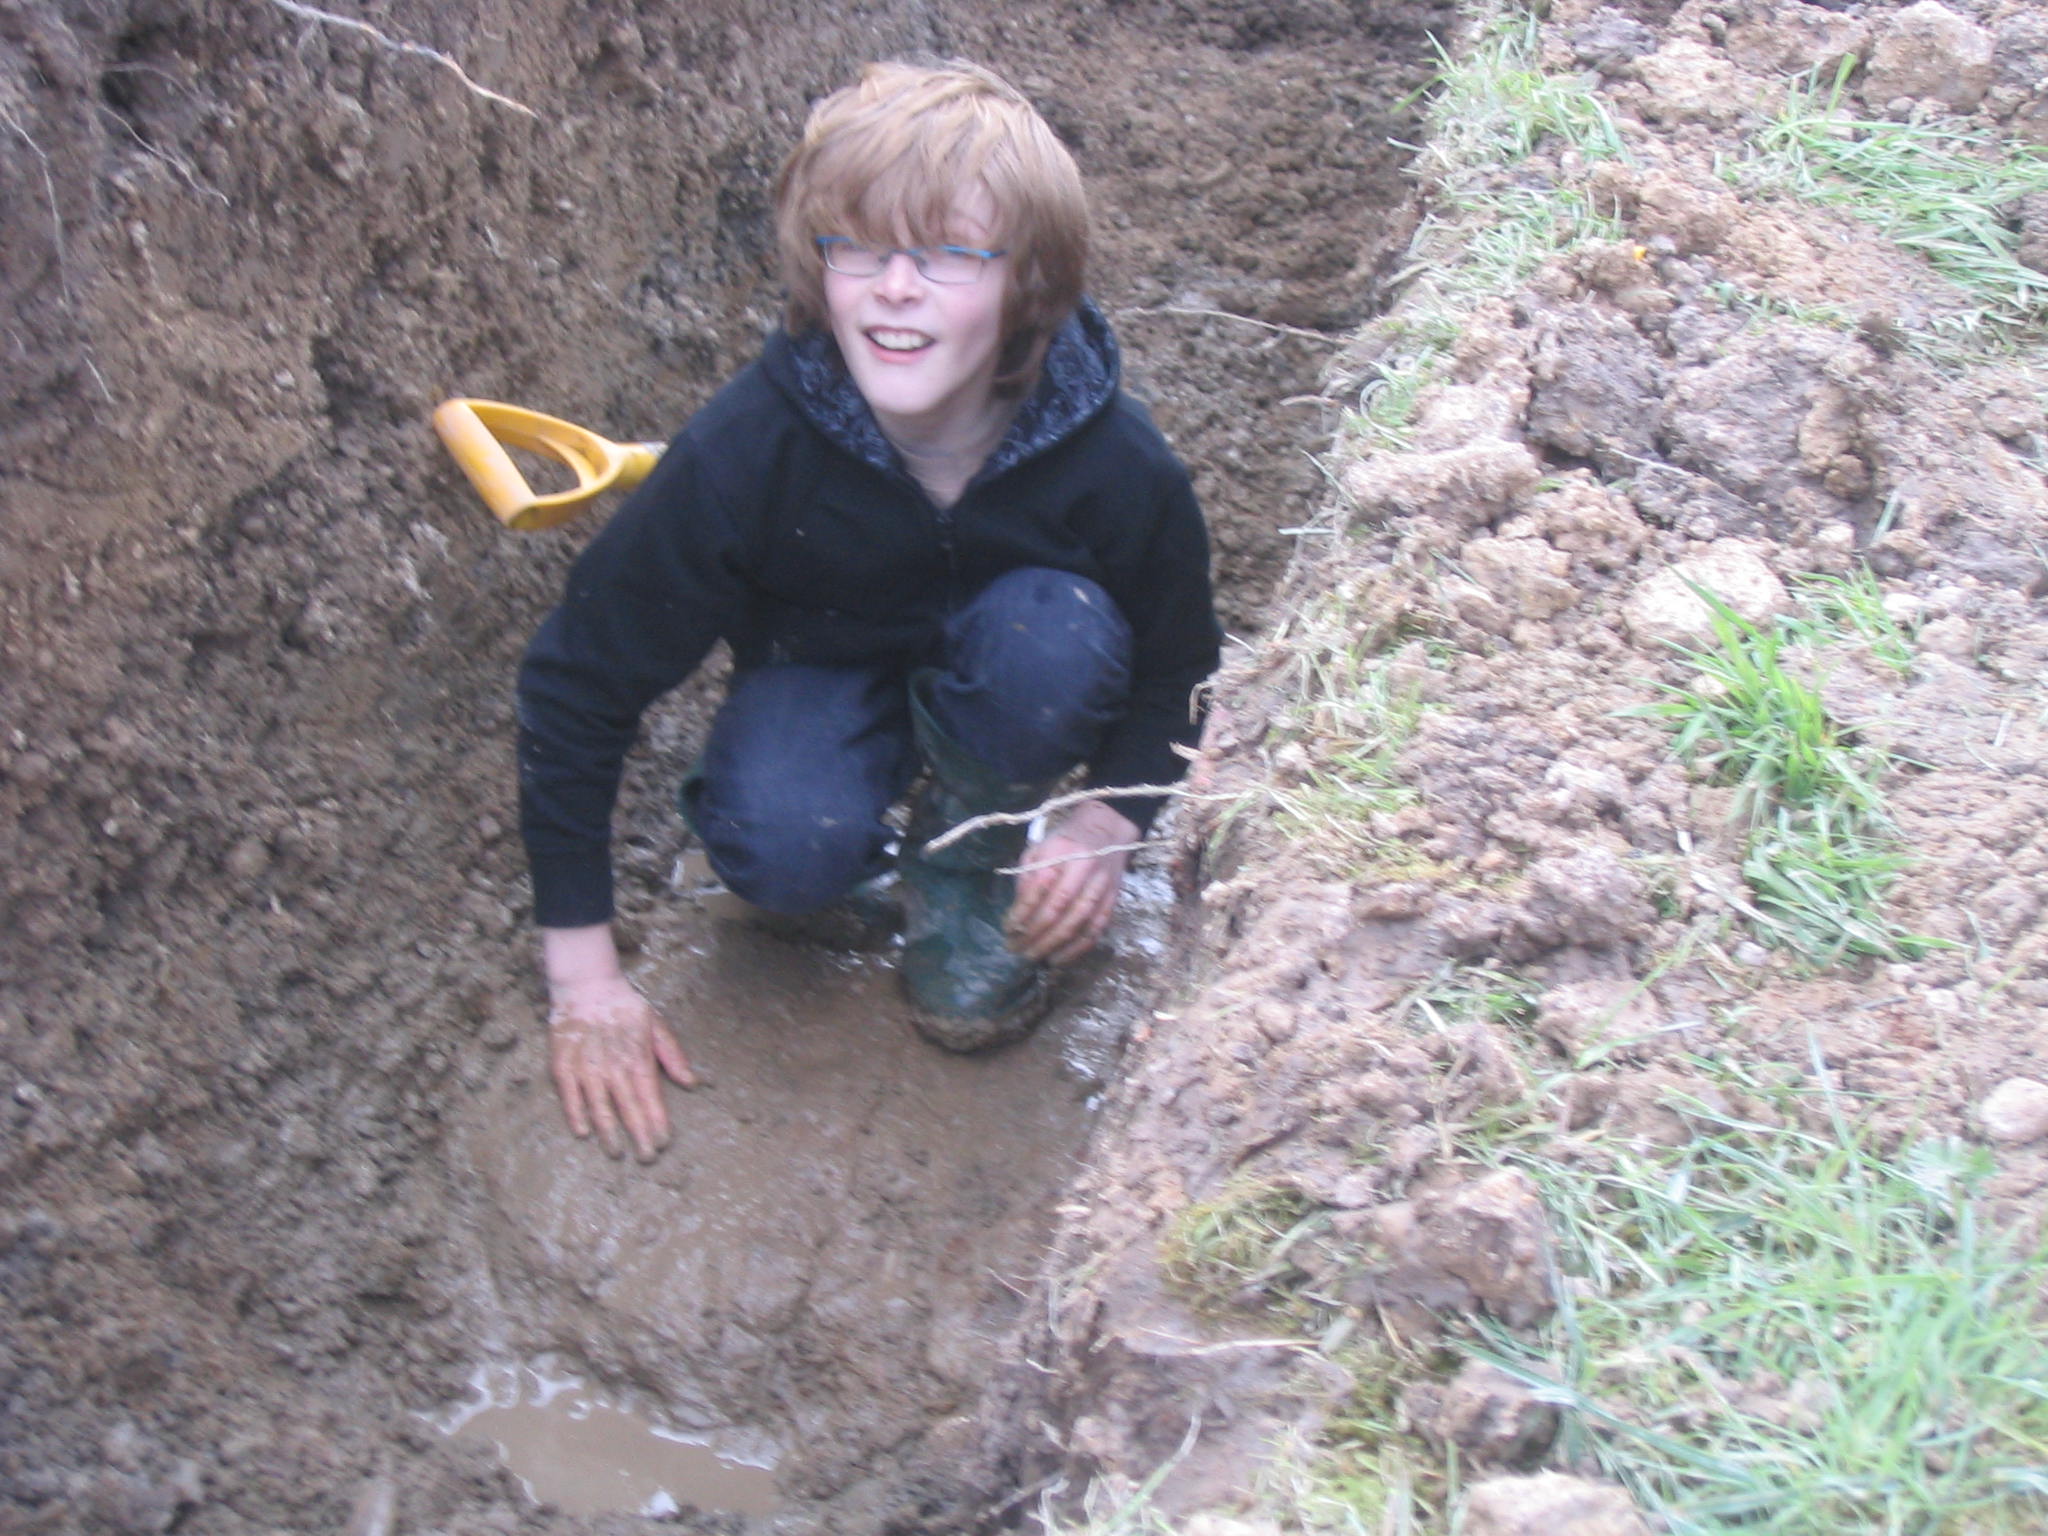
During backfilling I
introduced a couple of variants of my own. I sank 7 lengths of
rainwater pipe at various points so that I could take temperature
readings under the ground later. I purchased a digital thermometer
with a 1.5 metre probe for £6.50 so that I could do this
easily. These pipes will be decorated with solar lights to conceal
their purpose.
The rainwater pipes
could also be useful to enable the trench to be flooded should
additional thermal contact with the pipe be needed during operation.
Hopefully the hard packed floor of the trench would carry a
proportion of the water along the coiled slinky pipe.
I also buried 50 metres
of garden hose in each trench with the beginning and end at a
strategic point in the garden. I plan to use these loops to circulate
water underground to warm the soil in the Summer. They may work as
part of a solar water feature.
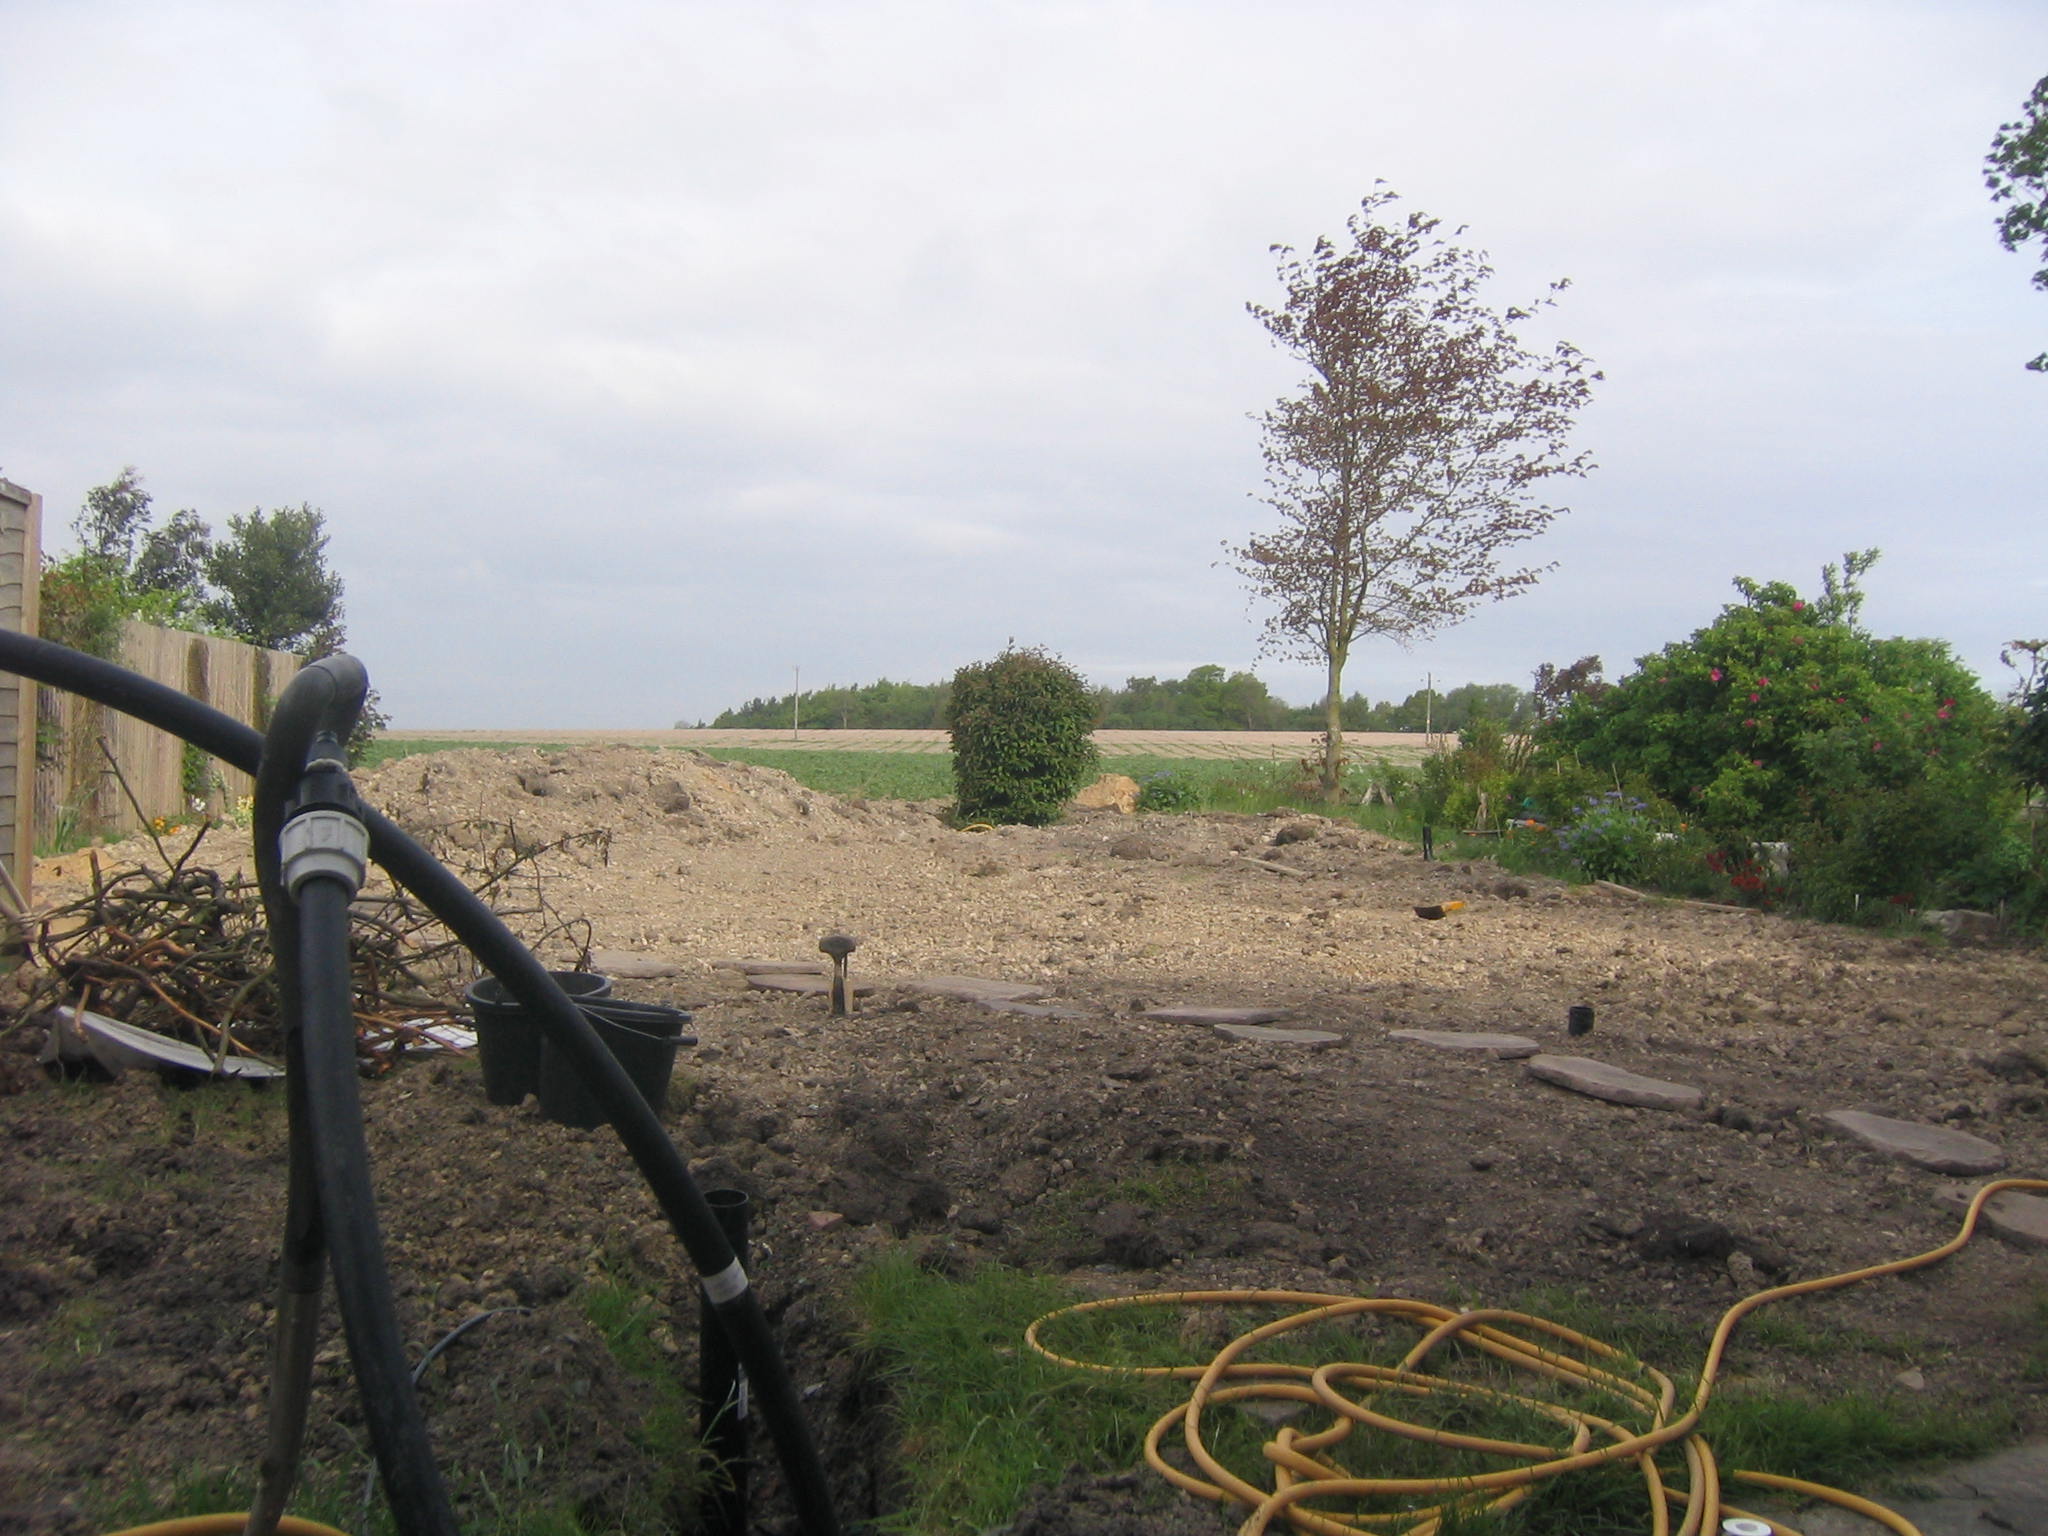
Having completed the
backfilling I took a further 4 hours of digger time to landscape the
garden. I lowered a trampoline into the ground to make it less
obtrusive and used the excavated soil to build a crescent shaped bank
to hide the trampoline and attract the eye from the fence into the
view beyond.
Pipe Testing
A pipe tester seemed
difficult to hire. I engaged a local plumber to come with his tester
and he asked for a couple of days notice. When I called him with half
a loop buried for a test he said his tester was now broken and he was
not expecting to replace it. He said that testing with the mains at 3
bar was almost as good.
So I filled and
pressured the pipe as described in the Ice Energy instructions
letting the water flow for 10 minutes to get rid of the air in the
coils. It certainly held pressure for an hour or so. When released a
jet of water issued for 20 seconds or so. This indicated to me that
there was still air trapped in the coils so I contacted Ice Energy
who said their installer would deal with that when commissioning.
I wanted to test the
way Ice Energy had recommended but I had difficulty finding a hire
place who could supply a pressure test kit. I have eventually found
Johnson Buildbase in Cowley who have recovered theirs from one of
their branches and have reserved it for me.
This proved an
interesting experience with no instructions except some diagrams on
the side of the appliance and the Ice Energy requirement that I
should test at 4 bar. I filled the tester with water, freshly filled
the pipe loop from the mains, and attached the tester. I closed valve
2 which directed the water pumped back into the tank and pumped away
for a few minutes. The gauge did not register any change in pressure.
Another few minutes pumping and the gauge started to move from the
end stop.
Pumping seemed to get
harder but to make more difference as the pressure steadily rose.
When the gauge showed 2 atmospheres pumping became quite hard and I
stopped, closed valve 1 and recorded the pressures every 5 minutes as
instructed by Ice Energy.
Then I looked at the
gauge more carefully. It was marked in 3 units of pressure, one of
which was psi or pounds per square inch. I had reached about 300 psi
which I realised was 20 atmospheres! I had tested to 5 times the
pressure required by accident! I was very thankful the pipe had not
burst! There was no indication on the gauge that the 1 bar line meant
10 bar. Beware!
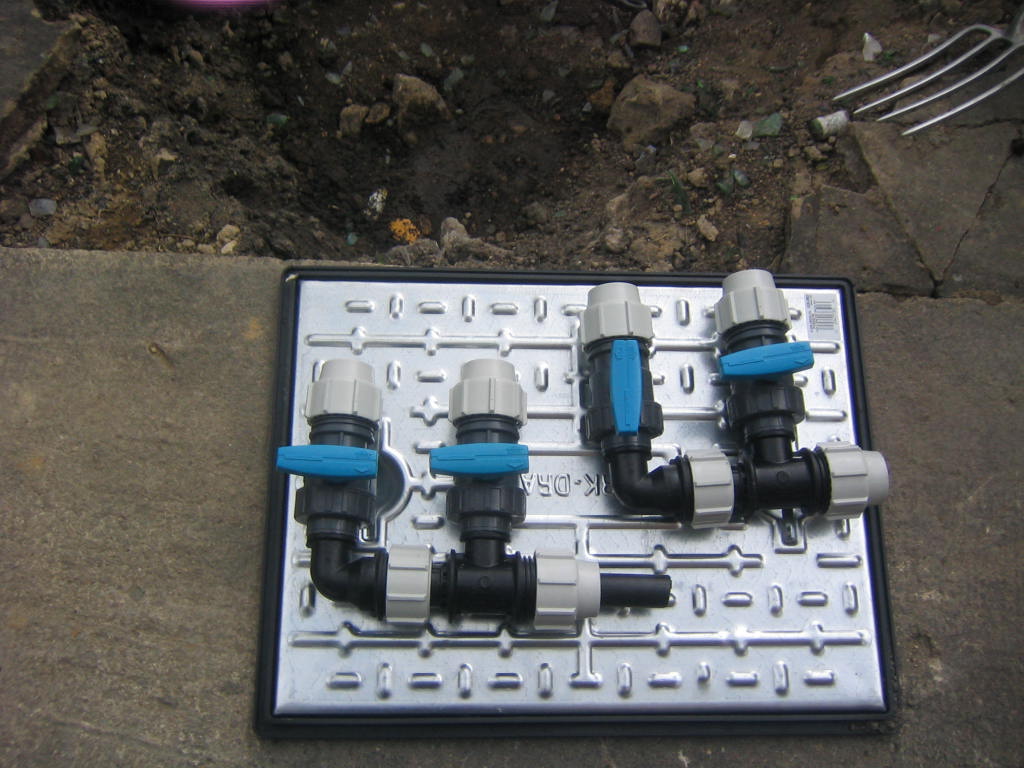
Preparing the Manifold
The instructions say I
have to purchase the components for the manifold but do not give a
list. However in the box of bits I have 6 gate valves and junctions
which look like suitable components. However they do not seem to be
complete enough to make 2 manifolds. I will phone Ice Energy next
week.
Meanwhile I have
purchased 30 engineering bricks, cement and a manhole cover.
Ice Energy helpline
have now emailed a schematic for assembly of the manifolds from the
components they delivered and putting them together was easy. Two
surplus gate valves had confused me.
When the manifolds were
assembled it was clear that the output pipe was at right angles to
the input pipes which was an alteration from the pictures in the
manual. No problem but helpful to know early on.
Restoring the Garden
I hired a rotavator for
the day for £38 plus VAT and set about breaking up the packed
earth left by the digger operations. I expected to find myself
driving a lawnmower type beast and was quite surprised. The machine
was very heavy and my first attempt was quite unsuccessful.
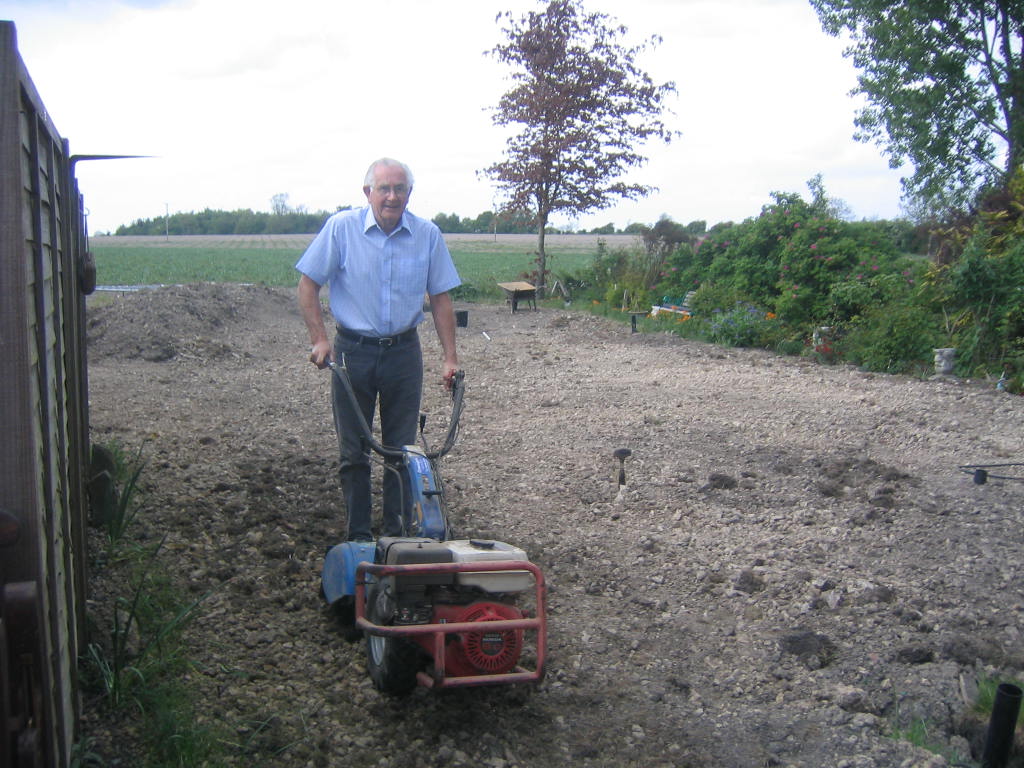
I was shown how to
start up and how to engage the forward drive.
A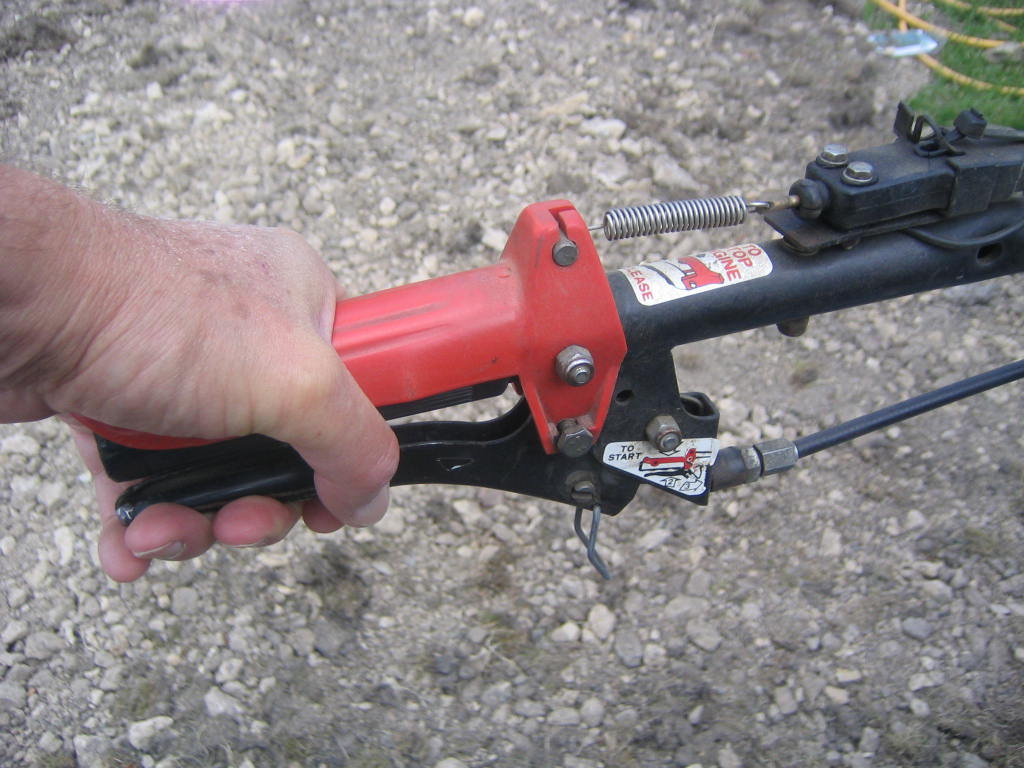 dead man’s hand safety device cuts the motor out if you let go
of the left side handle.
dead man’s hand safety device cuts the motor out if you let go
of the left side handle.
I tried this in the
back garden myself. Started the engine, engaged forward drive,
engaged the blades and gently released the clutch.
The rotavator leaped
forward hardly touching the ground and left me running to keep up.
Very fast but the results were minimal! I couple of high speed runs
and I had to stop and think.
It turned out that the
forward drive was almost engaged but not quite. It could be coaxed in
with a click just as the clutch started to bite. Then we moved off at
a controlled pace and the depth of the dig could be regulated by more
or less weight on the handles.
The ground was much
harder than I expected, especially in some patches, and after I had
tilled an inch or three I was amazed at the proportion of stones.
Where was the top soil? Where even was the clay I had experienced
during the past 2 years of gardening? All I had left was sub-soil and
stones.
The rotavator completed
its work in about 3 hours with only one mishap. On one section I
noticed my spirit level close to the line of tilling.
A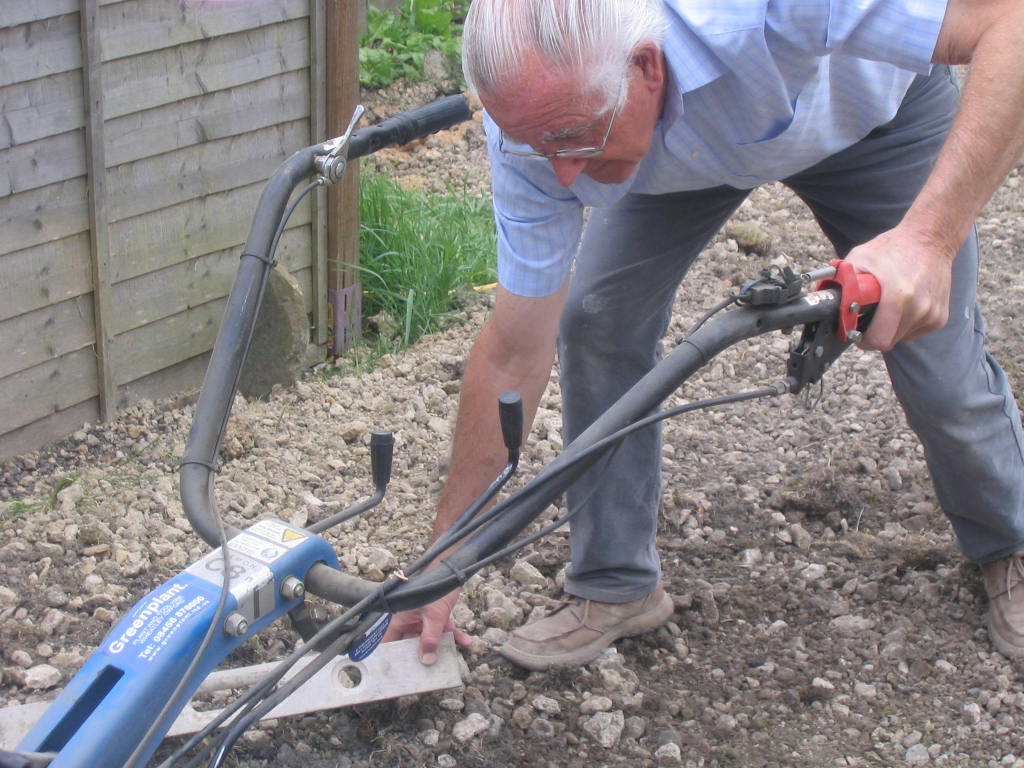 s
one might with a mower, I guided the rotavator with my left hand and
reached down with my right to pick up the level. Just then the
rotavator hit a stone and bounced sideways. The right handle hit the
side of my head quite a whack.
s
one might with a mower, I guided the rotavator with my left hand and
reached down with my right to pick up the level. Just then the
rotavator hit a stone and bounced sideways. The right handle hit the
side of my head quite a whack.
I let go of everything
and the machine came to a halt. I was dazed for a moment and wondered
why. Then I noticed my glasses had gone!
I found them intact, for which I was very grateful, but I must get them
re-adjusted at SpecSavers as they are not the same as before.
found them intact, for which I was very grateful, but I must get them
re-adjusted at SpecSavers as they are not the same as before.
So nothing more than a
small bruise for my adventure, but I will remember to keep both hands
firmly on the handles every second of the job in future. It’s
rather strange that the machine is plastered with safety does and
don’ts but there is no hint of this danger.
The next job was to
prepare for some grass seed. It is 10th May so if I can
get some seed down before I go away it might germinate before the hot
weather arrives.
I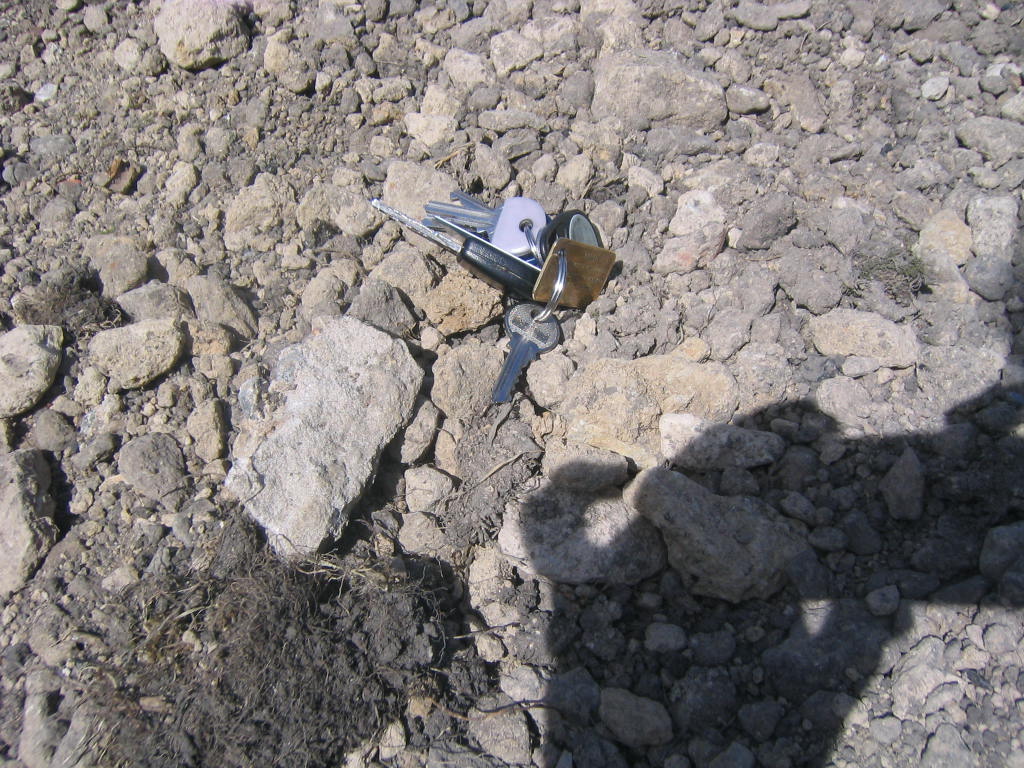 tried to rake the stones aside but only raised more from below. Some
were the size of eggs as you can see.
tried to rake the stones aside but only raised more from below. Some
were the size of eggs as you can see.
The most successful
method seemed to be to use a shovel to scrape the stones from the
surface very lightly leaving the soil and small stones behind. Once a
small pile of the larger stones was gathered they could be shovelled
into the wheel barrow.
Some top soil from the
front garden was added where there was no soil evident. The results
were poor but I scattered the seed in hope. I may have to order a
load of topsoil when the main building work is done anyway.
Time and Cost
The work so far took
much longer than I had expected. I booked the digger for one week and
have just returned it after 16 days. I worked 118 hours in total and
have still the testing and manifold to do. It was great fun and I
feel much fitter than for a long time. I had 15 hours of help for
which I paid £210. This was mainly to keep the digger working
through some of my meal breaks when I was concerned at the time the
work was taking.
The total of 153 hours
broke down approximately into 40 hours digging, 20 hours pipe
fitting, 37 hours barrowing sand, 32 hours back filling and 24 hours
landscaping.
Best of all I have the
satisfaction of knowing that corners were not cut and I have the most
efficient installation possible in my garden with current
understanding of the physics. Hopefully my measurements will enable
an even more efficient installation in the future.
|
Description
|
Cost
|
|
Kubota
|
£561
|
|
Sand
|
£396
|
|
Pipe Insulation
|
£120
|
|
Friends Helping
|
£210
|
|
Rotavator
|
£46
|
|
Pressure Test Kit
|
£21
|
|
Rainwater Downpipes Wickes 5
|
£27
|
|
Garden Hose 100 mts
|
£38
|
|
B&Q Luxury Grass Seed 20kg
|
£41
|
|
Total
|
£1460
|
Hope your job goes
well!